Search Recipes & Posts:

Friday, June 20, 2025

Forbidden Rice Congee with Fiery Tofu & Ginger Petals (Vegan)

Midnight Bloom:

Start your day (or any meal!) with this deeply comforting yet vibrantly flavorful vegan creation. Creamy, nutty forbidden rice congee provides a soothing base for intensely crispy chili-garlic tofu and delicate, tangy pickled ginger blossoms. It's a global fusion in a bowl that's both nourishing and utterly delicious. Try not to call it a "porridge"...!

Here at "Edible Intelligence," we're always seeking out dishes that not only taste fantastic but also offer a unique experience. This Forbidden Rice Congee is exactly that – a culinary journey that blends Asian comfort with a bold, modern twist.

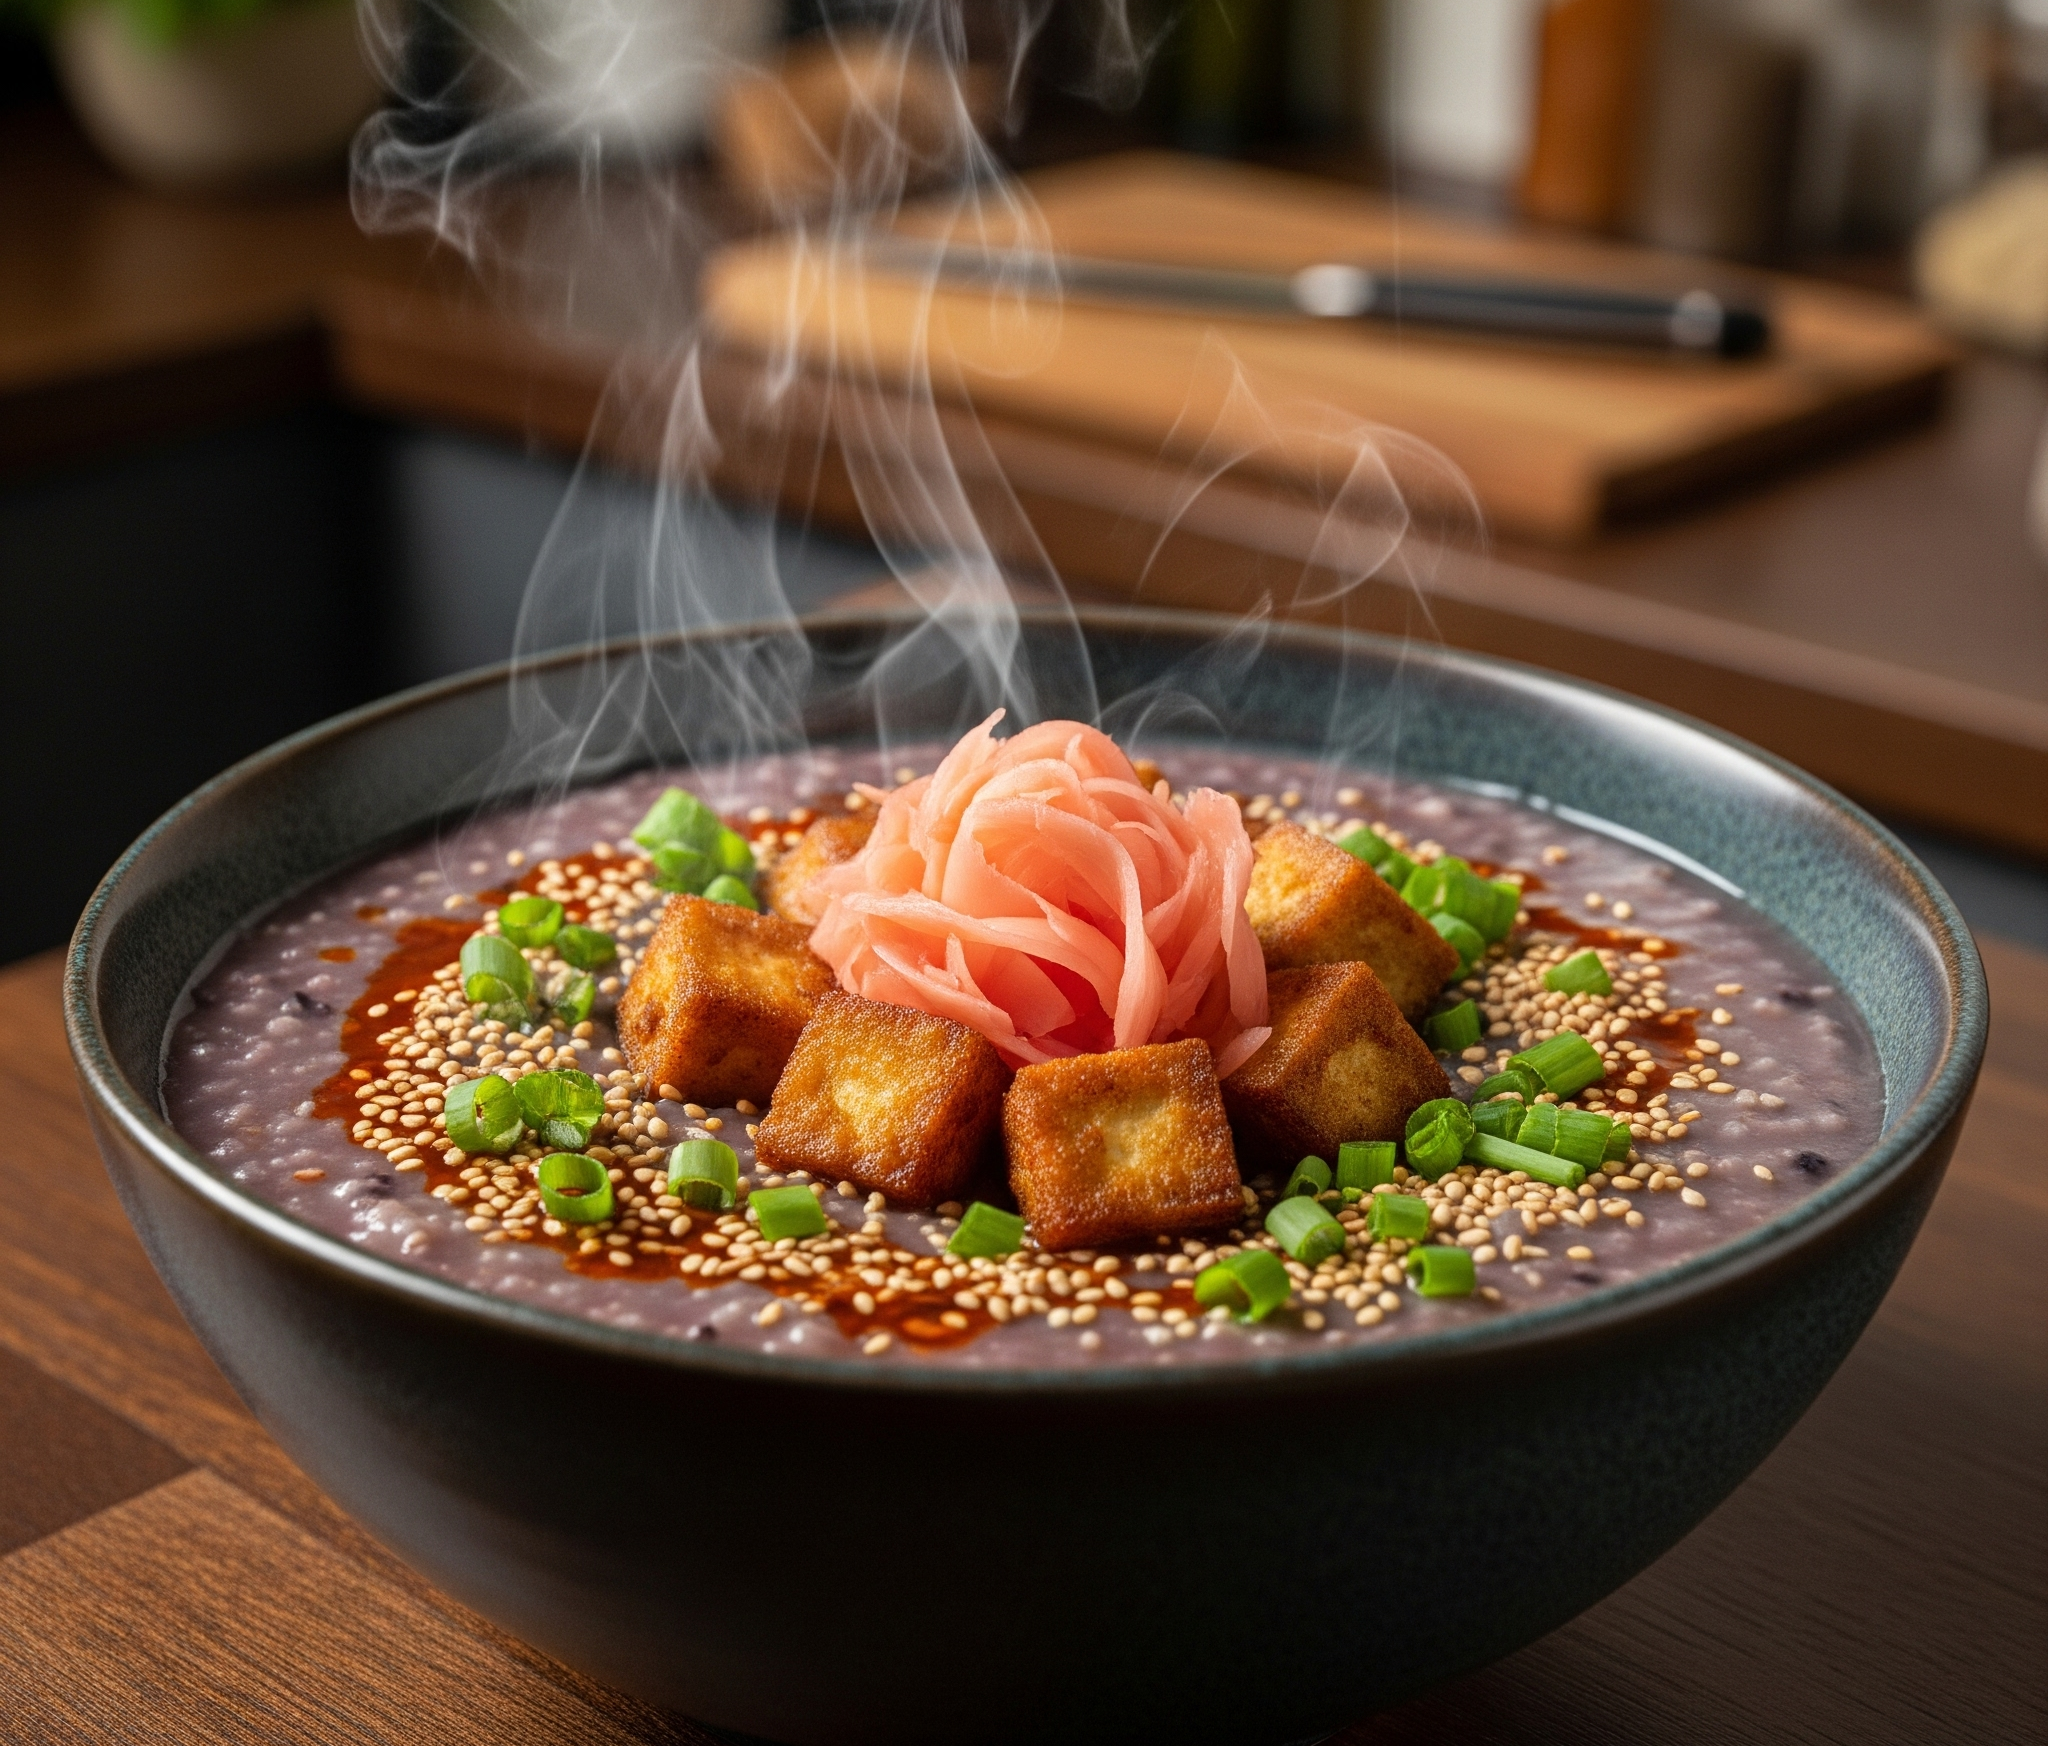
Forbidden rice, with its striking dark purple hue and subtly nutty flavor, forms the heart of this dish. Slowly simmered into a creamy congee (a type of rice porridge), it offers a soothing and satisfying base. But this is no ordinary bland porridge! We're elevating it with a topping of tofu that achieves ultimate crispy perfection, then gets tossed in a homemade chili-garlic oil that's both fiery and fragrant.

And for the final touch of brilliance? Delicate "blossoms" of pickled ginger, thinly sliced to resemble ethereal petals, adding a tangy, slightly sweet counterpoint to the richness of the congee and the heat of the tofu. It’s a visual and textural masterpiece in a bowl.

This Forbidden Rice Congee with Crispy Chili-Garlic Tofu & Pickled Ginger Blossoms is:

  • Uniquely Satisfying: Creamy congee meets crispy, flavorful tofu.
  • Flavor-Packed: Nutty rice, fiery chili-garlic, and tangy ginger create a delightful interplay.
  • Visually Stunning: The dark rice, golden tofu, and pale pink ginger blossoms are a feast for the eyes.
  • Perfect for Any Time: A nourishing breakfast, a light yet flavorful lunch, or a comforting dinner.
  • Completely Vegan: Deliciously plant-based without sacrificing flavor or texture.

Ready to embark on this flavorful adventure? Let's get cooking!


Midnight Bloom: Forbidden Rice Congee with Crispy Chili-Garlic Tofu & Pickled Ginger Blossoms (Vegan)

Creamy forbidden rice porridge topped with intensely crispy chili-garlic tofu and delicate pickled ginger "blossoms."

Yields: 2-3 servings Prep time: 30 minutes (plus rice soaking time, optional) Cook time: 1 hour 30 minutes (mostly simmering)

Ingredients:

For the Forbidden Rice Congee:

  • 1 cup forbidden black rice, rinsed (soaking for 1-2 hours is optional but can shorten cooking time)
  • 6-8 cups vegetable broth (or water)
  • 1 inch ginger, peeled and thinly sliced
  • 1 clove garlic, smashed
  • 1/2 teaspoon salt (or to taste)

For the Crispy Chili-Garlic Tofu:

  • 1 block (14-16 oz) extra-firm tofu, pressed to remove excess water
  • 2 tablespoons cornstarch
  • 2 tablespoons neutral oil (such as vegetable, canola, or peanut)
  • 2-3 cloves garlic, minced
  • 1-2 red chili peppers, thinly sliced (or red pepper flakes to taste)
  • 1 tablespoon soy sauce (or tamari for gluten-free)
  • 1 teaspoon rice vinegar
  • 1/2 teaspoon maple syrup (optional, for a touch of sweetness)

For the Pickled Ginger Blossoms:

  • 2-3 slices pickled ginger (the kind you get with sushi)

Optional Garnishes:

  • Toasted sesame seeds
  • Chopped scallions
  • A drizzle of chili oil

Instructions:

1. Prepare the Forbidden Rice Congee: * If soaking the rice, rinse it thoroughly and submerge it in water for 1-2 hours. Drain well. (If not soaking, just rinse thoroughly.) * In a medium pot, combine the rinsed forbidden rice, vegetable broth (start with 6 cups, you can add more later if needed for desired consistency), sliced ginger, smashed garlic, and salt. * Bring to a boil, then reduce heat to low, cover, and simmer gently for 1 to 1.5 hours, or until the rice grains have broken down and the congee is creamy and thickened. Stir occasionally to prevent sticking. Add more broth or water during cooking if the congee becomes too thick. * Once cooked, remove the ginger slices and garlic clove. Taste and adjust salt as needed. Keep warm over low heat.

2. Prepare the Crispy Chili-Garlic Tofu: * Cut the pressed tofu into ½-inch cubes. * In a medium bowl, toss the tofu cubes with cornstarch until evenly coated. * Heat the neutral oil in a large skillet or wok over medium-high heat. * Add the tofu cubes in a single layer (you may need to work in batches) and cook, turning occasionally, until golden brown and crispy on all sides (about 8-10 minutes). Remove the crispy tofu with a slotted spoon and set aside on a paper towel-lined plate. * Drain any excess oil from the skillet. Reduce the heat to medium and add the minced garlic and sliced chili peppers (or red pepper flakes). Cook for about 30 seconds until fragrant, being careful not to burn the garlic. * Return the crispy tofu to the skillet. Add the soy sauce (or tamari), rice vinegar, and optional maple syrup. Toss gently to coat the tofu evenly with the sauce. Cook for another minute until the sauce has slightly thickened and glazed the tofu.

3. Create the Pickled Ginger Blossoms: * Take each slice of pickled ginger and carefully separate it into thinner pieces. Arrange these thin pieces overlapping slightly in a circular pattern to resemble small blossoms or petals. Set aside.

4. Assemble and Serve: * Ladle the warm forbidden rice congee into bowls. * Top generously with the crispy chili-garlic tofu. * Garnish with the pickled ginger blossoms. * Sprinkle with toasted sesame seeds and chopped scallions, and drizzle with chili oil (if using). * Serve immediately and enjoy!

Nutritional Estimate (per serving, approximate, for 3 servings):

  • Calories: 400-500
  • Protein: 20-25g
  • Fat: 15-20g
  • Carbohydrates: 50-60g

(Note: This is an estimate and will vary based on specific ingredient amounts and portion sizes.)


A Bowl of Comfort with a Kick

This Forbidden Rice Congee with Crispy Chili-Garlic Tofu & Pickled Ginger Blossoms is a testament to how simple ingredients can come together to create something truly extraordinary. The creamy, nutty congee provides the perfect canvas for the bold flavors and textures of the crispy tofu and tangy ginger. It’s a dish that soothes the soul while exciting the palate – a true "Edible Intelligence" experience!

Smoked Cathedral City Steak & Spinach Pasta


Where has this been my whole life?

Here in Lexington, Kentucky, we cherish traditions, but we also have a taste for the unexpected, for flavors that dance on the palate and tell a new story. Lately, I've been pondering the rich, comforting textures of Indian Saag Paneer or Palak Gosht – those vibrant spinach dishes simmered with spices and often featuring cheese or meat. It got me thinking: why doesn't Italian cuisine have its own deeply comforting, spinach-centric dish in this vein?

That thought sparked an idea, a culinary fusion in spirit, if not strict origin. What if we took the creamy, dreamy texture of a spinach sauce, infused it with the smoky depth of a good aged cheddar (think of the robust character of Smoked Cathedral City), and paired it with the savory goodness of sautéed wild mushrooms, sweet caramelized onions, and crispy smoked bacon? And for the star protein, a perfectly seared steak, sliced and draped over this luxurious pasta creation?

The result, my friends, is the Smoked Cathedral City Steak & Spinach Pasta – a dish that feels both familiar and intriguingly novel. It’s the comfort of creamed spinach elevated to new heights, the earthy notes of the mushrooms singing alongside the smoky cheese, the salty bacon adding a delightful crunch, and the tender steak providing a satisfying richness. This isn’t yourNonnas classic, but it might just become a new family favorite.

The beauty of this dish lies in its layers of flavor. The smoked cheddar in the sauce isn't overpowering; instead, it provides a subtle but unmistakable depth that complements the fresh spinach beautifully. The wild mushrooms, sautéed until tender and slightly browned, lend an earthiness that grounds the dish, while the caramelized onions offer a touch of sweetness. And the bacon? Well, it’s bacon – adding that irresistible smoky, salty counterpoint.

Choosing the right pasta is key. We opted for wide ribbons of pappardelle, their generous surface area perfect for cradling the rich and flavorful sauce. Rigatoni would also work wonderfully, their ridges catching every last bit of creamy goodness.

The steak is the crowning glory. A good sirloin or flat iron, seasoned simply and seared to your preferred doneness, adds a touch of elegance and heartiness. Sliced thinly, it mingles beautifully with the sauced pasta, each bite a harmonious blend of textures and tastes.

This Smoked Cathedral City Steak & Spinach Pasta is a dish that's perfect for a cozy evening in, a special occasion, or anytime you're craving something truly satisfying and a little bit different. It’s a testament to how inspiration can come from unexpected places, and how culinary traditions can spark entirely new and delicious creations.

Ready to try this novel Italian-inspired comfort dish? Let’s get cooking!


Smoked Cathedral City Steak & Spinach Pasta

A creamy, smoky spinach pasta featuring sautéed mushrooms, caramelized onions, crispy bacon, and tender steak.

Yields: 4 servings Prep time: 30 minutes Cook time: 45 minutes

Ingredients:

For the Steak:

  • 1.5 lbs sirloin steak or flat iron steak, about 1-inch thick
  • 1 tablespoon olive oil
  • 1 teaspoon smoked paprika
  • 1/2 teaspoon garlic powder
  • Salt and freshly ground black pepper to taste

For the Pasta:

  • 1 pound pappardelle pasta (or wide rigatoni)
  • 2 tablespoons olive oil
  • 4 ounces smoked bacon, cut into lardons (small cubes or strips)
  • 1 large yellow onion, thinly sliced
  • 8 ounces wild mushrooms (shiitake, oyster, cremini, or a mix), sliced
  • 4 cloves garlic, minced
  • 10 ounces fresh spinach, roughly chopped
  • 1.5 cups heavy cream
  • 8 ounces Smoked Cathedral City cheddar cheese (or a good quality smoked cheddar), grated
  • 1/4 teaspoon freshly grated nutmeg
  • Salt and freshly ground black pepper to taste
  • 1/4 cup toasted pine nuts, for garnish
  • Aged balsamic glaze, for drizzling (optional)
  • Fresh thyme sprigs, for garnish (optional)

Instructions:

1. Prepare the Steak: * Pat the steak dry with paper towels. In a small bowl, mix the olive oil, smoked paprika, garlic powder, salt, and pepper. Rub this mixture all over the steak. * Let the steak sit at room temperature for at least 20 minutes before cooking.

2. Cook the Bacon and Sauté Vegetables: * Bring a large pot of salted water to a boil for the pasta. * In a large, heavy-bottomed skillet or Dutch oven, cook the bacon lardons over medium heat until crispy. Remove the bacon with a slotted spoon and set aside, leaving the rendered fat in the pan. * Add the sliced onions to the bacon fat and cook over medium-low heat, stirring occasionally, until deeply golden and caramelized (about 15-20 minutes). * Add the sliced mushrooms to the pan and sauté over medium heat, stirring occasionally, until they release their liquid and turn golden brown (about 8-10 minutes). * Stir in the minced garlic and cook for another minute until fragrant.

3. Make the Smoked Spinach Sauce: * Add the chopped spinach to the skillet with the mushrooms and onions. Stir until the spinach wilts down significantly. * Pour in the heavy cream and bring to a gentle simmer. Cook for 5-7 minutes, allowing the sauce to slightly thicken. * Remove the skillet from the heat and stir in the grated smoked cheddar cheese and freshly grated nutmeg until the cheese is melted and the sauce is smooth. Season with salt and pepper to taste.

4. Cook the Pasta: * Add the pappardelle pasta to the boiling water and cook according to package directions until al dente. Reserve about 1 cup of the pasta cooking water before draining. * Drain the pasta and add it directly to the skillet with the smoked spinach sauce. Toss well to coat. If the sauce seems too thick, add a little of the reserved pasta water to reach your desired consistency.

5. Cook the Steak: * While the pasta is cooking, heat a separate cast-iron skillet or heavy-bottomed pan over high heat until it’s very hot. Add a tablespoon of olive oil (if needed, depending on the fat content of your steak). * Sear the steak for 3-5 minutes per side (depending on thickness and desired doneness) until a nice crust forms and the internal temperature reaches your preference (e.g., 130-135°F for medium-rare). * Remove the steak from the pan and let it rest on a cutting board for at least 10 minutes before slicing thinly against the grain.

6. Assemble and Serve: * Divide the smoked spinach pasta among bowls. * Arrange slices of the seared steak over the pasta. * Garnish with the crispy bacon lardons, toasted pine nuts, and a drizzle of aged balsamic glaze (if using). Add a fresh sprig of thyme for visual appeal, if desired.

Nutritional Estimate (per serving, approximate):

  • Calories: 700-850 (depending on steak size and cream amount)
  • Protein: 50-60g
  • Fat: 40-50g
  • Carbohydrates: 50-60g

(Note: This is an estimate and will vary based on specific ingredients and portion sizes.)


A Novel Italian Comfort

The Smoked Cathedral City Steak & Spinach Pasta is more than just a meal; it's an experience. It’s the comforting embrace of creamed spinach reimagined with smoky sophistication, the savory dance of mushrooms and steak, and the satisfying chew of perfectly cooked pasta. It’s a novel dish born from a simple thought, a culinary exploration that we hope you’ll enjoy as much as we do. Buon Appetito!

Whipped Goat Cheese Strawberry Basil Tartlets w/ Black Pepper Crust


Peppered.

Elevate your appetizer game with these stunning tartlets! A crisp, savory black pepper crust holds airy whipped goat cheese, all crowned with a vibrant, jewel-like mix of sweet strawberries, fresh basil, and a surprising, playful hint of spice. A perfect symphony of flavors and textures for any sophisticated gathering!

There are appetizers, and then there are experiences. Those delightful little bites that wake up your palate, spark conversation, and leave you wanting just one more. Today, we're creating one of those experiences. Forget predictable, and say hello to a tartlet that’s a delicate dance of savory, sweet, tangy, herby, and just a whisper of heat.

Imagine a buttery, flaky pastry crust, but with a surprising, sophisticated edge – the gentle warmth of freshly cracked black pepper woven right in. This crisp little vessel then cradles a cloud of tangy, creamy whipped goat cheese, light as air and oh-so-smooth. But the real magic happens on top: glistening, diced fresh strawberries, mingling with fragrant basil, all brought together with a touch of sweet balsamic and a tiny, thrilling spark of spice that makes everything pop. It’s like a little jewel box of flavors.

This isn't just about combining ingredients; it's about creating harmony from contrasts. The peppery crust grounds the creamy cheese. The sweet strawberries are enlivened by the aromatic basil and that playful kick of spice. It’s a testament to how a few carefully chosen elements, treated with a bit of "edible intelligence," can create something truly special and memorable.

Perfect for a spring or summer soirée when strawberries are at their peak, these tartlets are as beautiful to look at as they are to eat. They may look intricate, but each step is straightforward, leading to an appetizer that’s bound to be the star of your table.


Peppered Kiss: Whipped Goat Cheese Tartlets with Spicy Strawberry-Basil Jewels

A sophisticated appetizer featuring a savory black pepper crust, light whipped goat cheese, and a vibrant topping of fresh strawberries, basil, and a hint of spice.

Yields: Approximately 12-16 mini tartlets Prep time: 45 minutes (plus 1 hour dough chilling) Cook time: 20-25 minutes (for tartlet shells)

Ingredients:

For the Black Pepper Crust:

  • 1 ¼ cups all-purpose flour
  • ½ teaspoon salt
  • ¾ teaspoon freshly cracked black pepper (medium grind)
  • ½ cup (1 stick) cold unsalted butter, cut into cubes
  • 3-5 tablespoons ice water

For the Whipped Goat Cheese Filling:

  • 8 oz fresh goat cheese (chèvre), softened
  • 2 tablespoons heavy cream (or olive oil for a different note)
  • 1 teaspoon lemon zest
  • Pinch of salt
  • Pinch of white pepper (optional)

For the Spicy Strawberry-Basil Topping:

  • 1 ½ cups fresh strawberries, hulled and finely diced (about ¾ lb)
  • 2 tablespoons good quality balsamic glaze (or 1 tbsp balsamic vinegar + 1 tsp honey/maple syrup)
  • ¼ teaspoon red pepper flakes (or to taste – start small!)
  • 2-3 tablespoons fresh basil leaves, thinly sliced (chiffonade)
  • Pinch of sugar (optional, if strawberries aren't very sweet)

Equipment:

  • Mini muffin tin (for 24 mini tartlets, you'll likely fill 12-16) or mini tartlet pans
  • Food processor (optional, for crust)
  • Pie weights or dried beans for blind baking

Instructions:

1. Make the Black Pepper Crust: * In a food processor, pulse the flour, salt, and black pepper until combined. Add the cold butter cubes and pulse until the mixture resembles coarse crumbs with some pea-sized butter pieces. * Alternatively, in a large bowl, whisk together flour, salt, and pepper. Cut in the butter using a pastry blender or your fingertips until coarse crumbs form. * Sprinkle 3 tablespoons of ice water over the mixture. Pulse (or mix gently with a fork) until the dough just starts to come together. If it's too dry, add more ice water, 1 teaspoon at a time. Be careful not to overwork the dough. * Turn the dough out onto a lightly floured surface, gather into a disc, wrap in plastic wrap, and refrigerate for at least 1 hour.

2. Blind Bake the Tartlet Shells: * Preheat oven to 375°F (190°C). * Lightly grease your mini muffin tin or mini tartlet pans. * On a lightly floured surface, roll out the chilled dough to about ⅛-inch thickness. Cut out rounds using a cookie cutter or glass that's slightly larger than your tartlet molds (e.g., 2.5 - 3 inch rounds for standard mini muffin tins). * Gently press the dough rounds into the molds. Prick the bottoms with a fork. * Line each tartlet shell with a small piece of parchment paper or a mini cupcake liner and fill with pie weights or dried beans. * Bake for 10-12 minutes. Carefully remove the parchment paper and weights. Bake for another 5-8 minutes, or until the shells are lightly golden and cooked through. * Let the tartlet shells cool in the pans for a few minutes before carefully removing them to a wire rack to cool completely.

3. Prepare the Whipped Goat Cheese Filling: * In a medium bowl, combine the softened goat cheese, heavy cream (or olive oil), lemon zest, salt, and white pepper (if using). * Beat with an electric mixer on medium speed (or whisk vigorously by hand) until light, fluffy, and smooth. Taste and adjust seasoning if needed.

4. Prepare the Spicy Strawberry-Basil Topping: * In a separate bowl, gently combine the diced strawberries, balsamic glaze, red pepper flakes, and sliced basil. Add a pinch of sugar only if your strawberries are particularly tart. * Let the mixture sit for at least 10-15 minutes at room temperature for the flavors to meld. Stir gently before using.

5. Assemble the Tartlets: * Once the tartlet shells are completely cool, carefully spoon or pipe the whipped goat cheese filling into each shell. * Just before serving, top each tartlet generously with the spicy strawberry-Basil mixture, allowing some of the juices to drizzle slightly. * You can garnish with an extra tiny basil leaf or a very fine crack of black pepper if desired.

Nutritional Estimate (per tartlet, approximate, for 16 tartlets):

  • Calories: 100-130
  • Protein: 3-4g
  • Fat: 7-9g
  • Carbohydrates: 8-10g

(Disclaimer: This is a rough estimate and can vary based on specific ingredients, tartlet size, and exact quantities.)


A Symphony in Every Bite

These "Peppered Kiss" tartlets are truly a delightful surprise. The crisp, savory crust gives way to the ethereal goat cheese, followed by the bright, sweet, and subtly fiery burst of the strawberry topping. They are an elegant testament to how contrasting flavors and textures can create something utterly captivating. Serve them at your next gathering, and watch them disappear!

Elote Fiesta Fritters w/ Zesty Crema


Fiesta in a Fritter

Craving the irresistible flavors of Mexican street corn but looking for a more shareable, less messy way to enjoy it? Look no further! These Miniature 'Elote' Fritters capture all the sweet corn goodness, the smoky chili kick, and the tangy lime zest of classic Elote in a crispy, golden bite. Served with a cool lime-cilantro crema and a sprinkle of salty Cotija cheese, these little fritters are a fiesta for your taste buds!

Here in Lexington, while we love our Southern traditions, we also embrace vibrant flavors from around the globe. And there's something truly magical about the combination of sweet corn, smoky chili, and bright lime – a flavor profile that sings in the beloved Mexican street food, Elote.

But let's be honest, as delicious as a grilled ear of corn slathered in creamy, spicy mayo can be, it's not always the most convenient appetizer for a party. That's where our Miniature 'Elote' Fritters come in!

We've taken the essence of Elote – the sweet corn kernels, the subtle heat of chili, the creamy coating – and transformed it into a delightful, bite-sized fritter that's perfect for sharing. These little nuggets are crispy on the outside, tender on the inside, and bursting with that signature Elote flavor.

And the best part? They're surprisingly easy to make! We'll whip up a simple batter, fold in the star ingredients, and then pan-fry or even bake these little flavor bombs until golden. A dollop of our tangy lime-cilantro crema and a dusting of salty Cotija cheese take them completely over the top.

These Miniature 'Elote' Fritters are:

  • Perfectly Poppable: Bite-sized and easy to grab.
  • Flavor-Packed: Bursting with the sweet, smoky, and zesty notes of Elote.
  • Crowd-Pleasing: A unique and delicious appetizer that everyone will love.
  • Versatile: Great for Cinco de Mayo, summer barbecues, or any time you're craving a little fiesta!

Ready to bring some sunshine to your appetizer spread? Let's get cooking!


Miniature 'Elote' Fritters with Lime-Cilantro Crema & Cotija Dust

Crispy and flavorful corn fritters inspired by Mexican street corn, served with a zesty lime-cilantro crema and a sprinkle of salty Cotija cheese.

Yields: Approximately 24-30 small fritters Prep time: 25 minutes Cook time: 20-25 minutes

Ingredients:

For the Fritters:

  • 2 cups fresh or frozen corn kernels (if frozen, thawed and drained)
  • ½ cup all-purpose flour
  • ¼ cup cornmeal
  • 1 teaspoon chili powder
  • ½ teaspoon smoked paprika
  • ¼ teaspoon garlic powder
  • Pinch of cayenne pepper (optional, for extra heat)
  • ½ teaspoon baking powder
  • ¼ teaspoon salt
  • Freshly ground black pepper to taste
  • 2 large eggs, lightly beaten
  • ¼ cup milk
  • 2 tablespoons chopped fresh cilantro
  • 1 green onion, thinly sliced
  • Vegetable oil, for frying (or cooking spray for baking)

For the Lime-Cilantro Crema:

  • ½ cup sour cream (or Mexican crema)
  • 2 tablespoons chopped fresh cilantro
  • 1 tablespoon fresh lime juice
  • ½ teaspoon lime zest
  • Pinch of salt

For the Cotija Dust:

  • 2-4 tablespoons Cotija cheese, finely grated

Instructions:

1. Prepare the Batter: * In a medium bowl, whisk together the flour, cornmeal, chili powder, smoked paprika, garlic powder, cayenne pepper (if using), baking powder, salt, and pepper. * In a separate bowl, whisk together the lightly beaten eggs and milk. * Gradually add the wet ingredients to the dry ingredients, whisking until just combined. Be careful not to overmix; a few lumps are okay. * Gently fold in the corn kernels, chopped cilantro, and sliced green onion.

2. Cook the Fritters (Frying Method): * Pour about ½ inch of vegetable oil into a large skillet over medium heat. Heat until the oil is shimmering (around 350°F/175°C). * Drop tablespoons of the batter into the hot oil, being careful not to overcrowd the pan. * Cook for 2-3 minutes per side, or until golden brown and cooked through. * Remove the fritters with a slotted spoon and drain on a wire rack lined with paper towels. * Repeat with the remaining batter, adding more oil to the pan if needed.

3. Cook the Fritters (Baking Method - Lighter Option): * Preheat oven to 400°F (200°C). Lightly grease a baking sheet with cooking spray. * Drop tablespoons of the batter onto the prepared baking sheet, leaving some space between each fritter. * Bake for 12-15 minutes, flipping halfway through, or until golden brown and cooked through.

4. Make the Lime-Cilantro Crema: * In a small bowl, combine the sour cream (or Mexican crema), chopped cilantro, lime juice, lime zest, and salt. Stir well to combine. Cover and refrigerate until ready to serve.

5. Assemble and Serve: * Arrange the cooked fritters on a serving platter. * Dollop each fritter with a small amount of the lime-cilantro crema. * Sprinkle generously with finely grated Cotija cheese. * Serve immediately and enjoy the fiesta!

Nutritional Estimate (per fritter, approximate):

  • Calories: 50-70 (depending on size and cooking method)
  • Protein: 2-3g
  • Fat: 2-4g (higher if fried)
  • Carbohydrates: 6-8g

(Note: This is an estimate and will vary based on specific ingredient amounts and cooking method.)


A Little Taste of Mexico, Made Easy!

These Miniature 'Elote' Fritters are a fun, flavorful, and fuss-free way to enjoy the iconic taste of Elote. Whether you fry them for extra crispiness or bake them for a lighter option, they're sure to be a hit at your next gathering. So grab some fresh corn, whip up that zesty crema, and get ready to experience a little fiesta in every bite! ¡Buen Provecho!

Sunday, June 15, 2025

Sweet Heat Corn & Jalapeño Muffins


Southern comfort, sweet heat!

Get ready for a cornbread experience unlike any other! We're taking the comforting, familiar taste of sweet cornbread muffins, studding them with delightful whole corn kernels, adding a spicy kick of fresh jalapeño, and then – the pièce de résistance – topping them with a unique sweet corn and jalapeño glaze. These muffins perfectly balance sweet, savory, and spicy, creating a truly addictive bite that will have everyone asking for the recipe.

I've always loved the combination of corn and jalapeño, whether in salsa, relish, or baked into bread. But I wanted to elevate it. Standard cornbread muffins are great, but sometimes they can be a little one-note. Adding whole corn kernels provides fantastic bursts of sweetness and texture, while finely diced jalapeño brings a gentle warmth that cuts through the richness. The real game-changer, though, is the glaze. It might sound unusual, but blending the essence of sweet corn with a hint of jalapeño heat into a sweet glaze creates this incredible layer of flavor that ties everything together. It makes the muffins moist, visually appealing with a lovely sheen, and adds that extra "wow" factor.

Making these was a journey of balancing flavors. How much jalapeño is enough without being overwhelming? How sweet should the glaze be? After a few test batches (delicious research, I must say!), I landed on this recipe. The muffins bake up beautifully golden, moist on the inside, with tender kernels and just the right amount of spice. The glaze adds a sticky, sweet-heat finish that complements the savory corn base perfectly. They are fantastic served warm alongside chili or BBQ ribs, but honestly, they're just as good on their own as a snack or even a slightly unconventional breakfast treat. The combination of textures and the interplay of sweet and spicy makes every bite exciting.


Sweet Heat Corn & Jalapeño Muffins Recipe

Yields: 12 standard muffins Prep time: 20 minutes Cook time: 18-22 minutes

Ingredients:

For the Muffins:

  • 1 cup all-purpose flour
  • 1 cup yellow cornmeal
  • 1/3 cup granulated sugar
  • 1 tablespoon baking powder
  • 1/2 teaspoon salt
  • 1 cup milk (or buttermilk for extra tang)
  • 1/4 cup melted unsalted butter (or vegetable oil)
  • 1 large egg, lightly beaten
  • 1 cup whole kernel corn (canned and drained, frozen and thawed, or fresh)
  • 1-2 fresh jalapeños, finely diced (remove seeds and membranes for less heat, adjust amount to your preference)

For the Sweet Corn-Jalapeño Glaze:

  • 1 cup powdered sugar
  • 2-3 tablespoons corn puree* (or reserved liquid from canned corn, or milk)
  • 1/2 - 1 teaspoon finely minced jalapeño (use the smallest dice possible, or just use jalapeño juice/brine for flavor without texture)
  • Pinch of salt

Corn Puree Note: To make corn puree, blend about cup corn kernels (fresh, frozen, or canned) with a tablespoon or two of water or milk until smooth. Strain if desired for a smoother glaze.

Instructions:

Make the Muffins:

  1. Preheat & Prep: Preheat oven to 400F (200C). Line a 12-cup standard muffin tin with paper liners or grease generously.
  2. Mix Dry Ingredients: In a large bowl, whisk together the flour, cornmeal, granulated sugar, baking powder, and salt.
  3. Mix Wet Ingredients: In a separate medium bowl, whisk together the milk (or buttermilk), melted butter (or oil), and lightly beaten egg.
  4. Combine: Pour the wet ingredients into the dry ingredients. Stir just until combined – do not overmix! A few lumps are perfectly okay.
  5. Fold In: Gently fold in the whole kernel corn and the finely diced jalapeños.
  6. Fill Muffin Cups: Divide the batter evenly among the 12 prepared muffin cups, filling each about two-thirds full.
  7. Bake: Bake for 18-22 minutes, or until the tops are golden brown and a wooden skewer inserted into the center of a muffin comes out clean.
  8. Cool Slightly: Let the muffins cool in the tin for 5 minutes before transferring them to a wire rack to cool further.

Make the Glaze:

  1. Combine Glaze Ingredients: While the muffins are cooling slightly (they should still be warm when glazed), whisk together the powdered sugar, 2 tablespoons of the corn puree (or liquid), the minced jalapeño (or juice), and the pinch of salt in a small bowl.
  2. Adjust Consistency: If the glaze is too thick, add more corn puree (or liquid), one teaspoon at a time, until it reaches a drizzle-able consistency. If it's too thin, add a bit more powdered sugar.
  3. Glaze the Muffins: Once the muffins have cooled for at least 5-10 minutes but are still warm, drizzle or brush the glaze over the tops.

Serve: Enjoy the muffins warm! They are best eaten the day they are made but can be stored in an airtight container at room temperature for up to 2 days.


Nutritional Estimate (per muffin):

  • Calories: Approx. 230-270 kcal
  • Fat: Approx. 8-10g
  • Saturated Fat: Approx. 4-5g
  • Carbohydrates: Approx. 35-40g
  • Fiber: Approx. 2g
  • Sugars: Approx. 15-18g
  • Protein: Approx. 4-5g
  • Sodium: Approx. 250-300mg

(Note: This is an estimate and can vary based on specific ingredients used, especially the amount of sugar and butter/oil, and the type of milk.)


I really hope you give these Sweet Heat Corn & Jalapeño Muffins a try! They're a delightful twist on a classic, bringing together sweet, savory, and spicy in the most delicious way. Happy baking!

Curry Chicken Wraps


    These wraps combine the rich flavors of Indian curry with the convenience of a handheld meal. Tender curry chicken is paired with fragrant rice pulao, fresh onions, and juicy tomatoes, all wrapped in warm naan bread for a satisfying and flavorful experience.

Aromatic Rice Pulao: The Perfect Base

Rice pulao, a fragrant and flavorful rice dish, forms the base of these wraps. It's typically made with basmati rice, aromatic spices, and sometimes vegetables, creating a delicious and complementary foundation for the curry chicken.

Curry Chicken: A Cornucopia of Spices

The curry chicken is the star of the show, offering a rich and complex flavor profile. A blend of aromatic spices, often including cumin, coriander, turmeric, and garam masala, creates a warm and inviting curry sauce that coats the tender chicken.

Chicken Florentine Quesadilla


This recipe combines the creamy, comforting flavors of chicken Florentine with the ease and portability of a quesadilla. Spinach tortillas enclose a delicious filling of chicken, spinach, artichoke, and cheese, creating a satisfying and flavorful meal.

A Florentine Twist on a Classic

    Chicken Florentine - a dish typically featuring chicken cooked in a creamy spinach sauce. This quesadilla adaptation captures those key flavors, making it a fun and accessible way to enjoy a classic. The spinach tortillas complement the filling, adding an extra layer of flavor and visual appeal.   

Monthly Recipes & Posts: