
A striking, cross-cultural evolution of the classic burger that re-imagines the structural components of an Asian dumpling into a crispy, seared seafood patty, cradled by a savory furikake milk bun and grounded by a vibrant stir-fried vegetable bed.


Finding a non-alcoholic beer that holds its own in a hot fryer can be a challenge. Most NA options lose their personality the moment they hit the flour, leaving you with a batter that’s crisp but essentially flavorless. However, using a brew like the Trail Pass IPA changes the dynamic entirely. Because it’s brewed with traditional methods to maintain a "silky malt body" and robust hop profile, those signature notes of Amarillo and CTZ hops actually survive the sizzle.
Let's be real. I struggled with drinking, so finding a non-alcoholic beer to cook with, that didn't taste like it was watered down was a difficult task of trial and error. But after encountering a multi-pack of Sierra Nevada Non-Alcoholic IPA... I finally found my cooking beer! It has all the depth and hoppiness, and none of the same risks associated with carrying, well... regular beer. Feel free to use your own favorite IPA.
The experience of cooking this is incredibly satisfying. As the cold, carbonated IPA hits the dry ingredients, it creates a thick, velvety foam that translates into a shattered-glass level of crispiness once fried. The kitchen fills with the scent of fresh pine and bright citrus, which perfectly cuts through the richness of the oil. Eating it is even better—the fish remains flaky and steamed to perfection inside its golden shell, with a subtle, clean bitterness that makes every bite feel balanced rather than heavy. It’s the kind of meal that proves you don't need the alcohol to get the complex, craft-beer results we’re always looking for.


The holy grail of the culinary world isn't a rare truffle or an endangered species of fish; it's a condiment that truly does it all. A sauce that doesn't just mask the flavor of the food it coats, but actively harmonizes with its molecular structure to elevate the eating experience. The challenge was monumental: create a novel sauce that meets the Universal Flavor Profile—a perfect equilibrium of umami, sweet, salty, sour, and a whisper of bitter/spicy tension—while possessing the versatility to complement poultry, beef, potatoes, battered fish, and even scrambled eggs.
Welcome to the science of the Savant Sauce.
To achieve this, we have to look past culinary tradition and directly at the science of taste receptor activation and flavor synergy. The foundation of any universal savory sauce rests on the Maillard reaction and the multiplier effect of glutamates. When glutamic acid (found heavily in foods like tomatoes and fermented soybeans) meets ribonucleotides like inosinate (abundant in meats like chicken and steak), the umami perception doesn't just add together; it multiplies up to eight times. This is why we anchor the Savant Sauce with a combination of double-concentrated tomato paste and white miso. These ingredients provide a massive, complex glutamate baseline without pushing the flavor profile into distinctively "Italian" or "Japanese" territories.
But umami alone can be heavy and exhausting to the palate. To bridge the gap between heavy proteins (like a burger or steak) and fried starches (like french fries), we need an intelligent fat-and-acid matrix. The base of the sauce relies on a stable oil-in-water emulsion—whole egg mayonnaise. This provides the necessary viscosity to cling to a french fry and the lipid content to coat the tongue, delivering fat-soluble flavor compounds directly to your taste buds.
To give this sauce the ability to transition from a fast-food staple to a steakhouse accompaniment, we introduce a crucial, novel step: blooming spices and tomato paste in browned butter. Browned butter (beurre noisette) undergoes its own Maillard reaction, producing nutty, rich compounds that instantly resonate with the profile of seared steak and scrambled eggs. By blooming our smoked paprika and tomato paste in this hot fat, we unlock their fat-soluble aromatics before they even hit the emulsion.
For the acid component, a dual approach is necessary. A single acid can taste flat, so we utilize apple cider vinegar for its fruity, acetic punch, and dill pickle brine for lactic acid and lingering botanical notes. This combination mimics the bright, mouth-watering snap that cuts through the rich batter of fried fish or the dense crumb of a chicken nugget. Finally, a touch of dark brown sugar rounds out the harsh edges, and the enzymatic bite of raw black garlic—which is aged to sweet, balsamic-like perfection—ties the earthy, sweet, and savory elements together in a way raw garlic simply cannot.
The resulting experience is a revelation. Dip a fry into the Savant Sauce, and the bright acid and creamy fat hit first, reminiscent of classic drive-thru fry sauces, before finishing with a deep, savory resonance. Smear it on a burger, and the miso and black garlic amplify the beefiness of the patty. Brush it over grilled chicken, and the smoked paprika and browned butter add a rich, wood-fired illusion. Even swirled into softly scrambled eggs, the butter notes and umami depth transform a simple breakfast into something profoundly rich.
It is calculated, it is precise, and it is universally delicious. It... Also clearly takes a bit of what makes all the specific sauces so good, and combines them into one, universal, radical condiment!
The "Universal Flavor Profile" usually hits a wall when it tries to bridge the gap between dairy-heavy foods (eggs/steak) and starch-heavy foods (fries). Most sauces lean too far into vinegar (ketchup/mustard) or too far into fat (mayo/hollandaise).
The Browned Butter Catalyst: By browning the butter, we create pyrazines and furans that mimic the crust of a seared steak and the golden edges of a fried egg.
The Triple-Threat Umami: Most sauces use one source (soy or tomato). We use three: Tomato (glutamates), Miso (kojic acid/fermented protein), and Black Garlic (S-allyl-cysteine). This creates a flavor curve that doesn't peak and vanish but lingers on the palate.
The Dual-Acid Matrix: Apple cider vinegar provides the sharp "top note" for the chicken, while pickle brine provides the "bottom note" of salt and dill that makes the fries and sliders feel classic.
This is more than a condiment; it’s a culinary bridge.
Also be sure to check out our rub/spice blend, that is made to not only enhance meats used with this sauce, but enhance the dish's cooking process and flavor all on it's own!
Ingredients
1 cup (230g) whole egg mayonnaise (do not use low-fat alternatives; the lipid structure is critical)
1 tbsp (15g) unsalted butter (Kerrygold slaps here)
1 tbsp (15g) double-concentrated tomato paste (Usually found in tubes)
1 tbsp (15g) white miso paste (shiro miso)
2 large cloves black garlic
1 tbsp (15ml) apple cider vinegar
1 tbsp (15ml) dill pickle brine (straight from the jar)
1 tsp smoked paprika
1 tsp dark brown sugar, tightly packed
1/2 tsp Dijon mustard
1/4 tsp ground black pepper
Processes/Steps
The Browned Butter Bloom: Place a small skillet or saucepan over medium heat. Add the unsalted butter and allow it to melt, crackle, and eventually foam. Swirl the pan continuously until the butter solids drop to the bottom and turn a toasted hazelnut brown, releasing a nutty aroma (roughly 2 to 3 minutes).
Aromatic Extraction: Immediately remove the skillet from the heat to prevent burning. Whisk the smoked paprika and the double-concentrated tomato paste directly into the hot brown butter. The heat will rapidly extract the fat-soluble flavor compounds and lightly caramelize the tomato sugars. Let this mixture cool completely to room temperature.
The Paste: On a cutting board, smash the black garlic cloves with the flat side of a knife. Because black garlic is soft and jelly-like, drag the blade across it repeatedly until it forms a perfectly smooth paste.
The Emulsion Assembly: In a medium mixing bowl, combine the mayonnaise, white miso paste, black garlic paste, apple cider vinegar, pickle brine, dark brown sugar, Dijon mustard, and black pepper.
Integration: Scrape the cooled browned butter, tomato, and paprika mixture into the bowl. Whisk vigorously until the sauce achieves a uniform, glossy, pale-sunset orange color with no streaks remaining.
The Maturation Phase: Transfer the sauce to an airtight container and refrigerate for a minimum of 2 hours, though overnight is highly recommended. This rest period is scientifically vital; it allows the water-soluble and fat-soluble compounds to fully hydrate and integrate, drastically smoothing out the acidity and deepening the umami profile.
(Per serving, based on a 2-tablespoon yield. Recipe makes roughly 1.25 cups total.)
Calories: 165 kcal
Total Fat: 17g
Saturated Fat: 3.5g
Carbohydrates: 2.5g
Protein: 0.5g
Sodium: 190mg
Whether meticulously applied to a perfectly seared ribeye or casually dragged across a late-night plate of fries, the Savant Sauce is proof that when we understand the architecture of flavor, there are no limits to what we can elevate. Keep creating, keep tasting, and never settle for the standard condiment aisle again.

Classic Herb Pan Sauce (The Magic of Fond)
Unlock the culinary world's best-kept secret with this luxurious, flavor-packed pan sauce that transforms those stubborn, browned bits in your skillet into pure liquid gold.

When analyzing the modern street food landscape, there is a glaring statistical anomaly: the distinct lack of a true, globally recognized Indian hot dog. While fusion concepts like Manchurian dogs exist, the rich, smoke-infused profiles of traditional Tandoori and kebab cooking are perfectly engineered for the handheld hot dog format.
At Edible Intelligence, we don't just put fusion on a plate; we build it from the ground up. By utilizing a heavily spiced Seekh Kebab as the protein, a custom-shaped Naan as the vessel, and precision-layered chutneys and dry-curried relishes, we can create a structurally sound, highly customizable, and deeply authentic culinary experience.
The traditional hot dog relies on a simple triad: savory meat, a neutral carb, and high-acid/high-texture toppings. To map Indian flavor profiles onto this framework without turning the dish into a soggy disaster, we must adhere to a few culinary realities:
Structural Integrity of the Bread: Traditional hot dog buns dissolve under the weight of wet chutneys. Tandoori Naan, specifically baked in an elongated "bun" shape, offers chew, structural support, and the perfect canvas for variations (Garlic, Bullet, etc.).
Moisture Control: Standard curries are too liquid. We must utilize sukhi sabzi (dry vegetable curries) or highly textured slaws to provide the required flavor without compromising the bread.
The Binding: Seekh kebabs need a binder to retain their shape on a skewer and a grill. Roasted chickpea flour (besan) absorbs excess moisture from the ground meat and onions, ensuring the "dog" doesn't fall apart during cooking or consumption.
This recipe provides the foundational elements. It is scaled for home execution using an oven broiler or grill to mimic tandoor temperatures, but is entirely adaptable to a commercial flat-top or charcoal grill.
Yields: 6-8 Kebabs
Ingredients:
1 lb (450g) Ground Lamb or Chicken thigh (minimum 15-20% fat content for juiciness)
1 medium Red Onion, grated and thoroughly squeezed of all excess water
3 cloves Garlic, minced to a paste
1 inch Ginger, grated
2 green Chilies (Serrano or Thai), finely minced
2 tbsp Fresh Cilantro, finely chopped
1 tbsp Fresh Mint, finely chopped
1.5 tbsp Roasted Chickpea Flour (Besan) - Crucial for binding
1 tsp Cumin powder
1 tsp Coriander powder
1 tsp Garam Masala
1/2 tsp Kashmiri Red Chili Powder (for color and mild heat)
1 tsp Salt (or to taste)
1 tbsp Ghee or neutral oil (plus more for basting)
Execution:
Mix & Macerate: In a large bowl, combine the ground meat with all aromatics, spices, and the roasted chickpea flour. Mix aggressively by hand for 3-5 minutes. This develops the myosin in the meat, creating a sticky, sausage-like texture that will hold its shape.
Rest: Cover and refrigerate for at least 2 hours (or overnight). Cold fat and relaxed proteins are essential for molding.
Mold: Divide the mixture into 6-8 equal portions. Lightly oil your hands. Mold each portion around a metal skewer (or soaked wooden skewer), creating a smooth, even cylinder roughly the length of your bun.
Cook (Home Tandoor Hack): Preheat your oven broiler to high, placing the rack about 4 inches from the heat source. Suspend the skewers across a high-sided baking dish so the meat does not touch the bottom. Broil for 8-12 minutes, turning carefully every 3 minutes, and basting with ghee until slightly charred and cooked through (165°F/74°C internal).
Commercial execution: Cook directly on a high-heat charcoal grill or flat-top, basting with ghee.
While you can use standard high-quality brioche buns toasted in ghee, the true innovation is the Naan-Bun.
Method: Use your preferred standard Naan dough recipe. Instead of rolling it into flat teardrops, shape the dough into thick, 6-inch elongated ovals.
Bake: Cook on a blistering hot cast-iron skillet or pizza stone. Brush immediately with ghee or garlic butter upon removal. Slice open like a top-split New England hot dog bun, not going too deep but enough to support the kebab and it's toppings.
To prevent decision paralysis for the consumer or the home chef, here are three culinarily sound builds that balance acid, fat, heat, and texture.
The most traditional flavor profile, mimicking street-side kebab rolls.
The Bread: Plain or Butter Naan-Bun.
The Meat: Chicken Seekh Kebab.
The Toppings: * Kachumber Slaw: Finely diced red onions, tomatoes, and cucumbers tossed in lime juice and Chaat Masala.
Sauce: Heavy drizzle of Green Mint-Cilantro Chutney.
Garnish: Fresh cilantro leaves.
Utilizing dry-curry techniques to act as a complex, savory relish.
The Bread: Garlic & Cilantro Naan-Bun.
The Meat: Lamb Seekh Kebab.
The Toppings:
Aloo Gobi Relish: Extremely finely diced potatoes and cauliflower, pan-fried in mustard oil with turmeric, cumin seeds, and dry mango powder (Amchur) until crispy and dry.
Sauce: Tamarind-Date Chutney (for sweetness to cut the earthy relish).
Garnish: A generous sprinkle of fine Sev (crispy chickpea noodles) for crunch.
For those seeking intense spice, counterbalanced by dairy.
The Bread: Bullet Naan-Bun (studded with fresh green chilies and garlic).
The Meat: Chicken or Lamb Seekh Kebab.
The Toppings:
Pickled Onions: Red onion slices quick-pickled in vinegar and sugar.
Sauce: A layer of cooling Cucumber Raita on the bottom of the bun, topped with a fiery Lahsun (Garlic-Chili) chutney over the meat.


Are you a spice aficionado? Do you crave a heat that ignites your senses and leaves you breathlessly reaching for more? Then prepare to meet your match: 'Arrabbiata Diavola', the "angry devil" pasta. This isn't just a spicy sauce; it's a fiery inferno of flavor, built upon the classic Italian arrabbiata and supercharged with the smoky, untamed heat of Calabrian 'Nduja, all crowned with a crunchy, spicy 'Nduja breadcrumb topping. This is a pasta dish that dares you to take the heat... and rewards you with an intensely delicious experience.
Here in Lexington, we appreciate a bit of zest in our lives, and lately, my culinary explorations have led me down a particularly spicy path. I wanted to create a dish that wasn't just hot for the sake of being hot, but one where the heat was a crucial element of a complex and deeply satisfying flavor profile. That's where the inspiration for 'Arrabbiata Diavola' struck.
We start with the foundational fury of a classic arrabbiata: San Marzano tomatoes simmered with garlic and a generous flurry of fiery red pepper flakes. But we don't stop there. We introduce the secret weapon: 'Nduja, the spreadable, spicy pork sausage from Calabria. As it melts into the tomato sauce, it releases its rich, porky flavor and a unique, slow-burn heat that permeates every strand of pasta.
But the devilish details don't end with the sauce. To add a textural counterpoint and another layer of intense flavor, we create crispy 'Nduja breadcrumbs. Breadcrumbs are toasted in the rendered spicy fat of the 'Nduja, infusing them with its signature heat and savory depth. Sprinkled generously over the finished pasta, they provide a delightful crunch and an extra kick with every bite.
Now, for the challenge: this recipe is scalable to your spice tolerance. Are you a mild-mannered enthusiast? Use a small amount of 'Nduja and go easy on the extra chili flakes. A true spice demon? Load it up! The beauty of 'Arrabbiata Diavola' is that it allows you to walk the fiery edge, creating a dish that's perfectly tailored to your personal heat preference. Just be warned: this pasta has a serious attitude.
Recipe
Yields: 4 servings Prep time: 10 minutes Cook time: 25 minutes
Ingredients:
For the 'Arrabbiata Diavola' Sauce:
2 tablespoons olive oil
4 cloves garlic, thinly sliced
1 teaspoon (or more, to taste) red pepper flakes
1 (28-ounce) can San Marzano tomatoes, crushed by hand
2-4 ounces 'Nduja sausage, crumbled or roughly chopped (See Note)
½ teaspoon salt, or to taste
¼ teaspoon black pepper, or to taste
Fresh basil leaves, torn, for garnish
For the Crispy 'Nduja Breadcrumbs:
2 ounces 'Nduja sausage, crumbled
½ cup panko breadcrumbs
1 clove garlic, minced (optional)
For Serving:
1 pound dried penne pasta (or your favorite shape)
Grated Pecorino Romano cheese (optional)
Note on 'Nduja: For a moderately spicy dish with great flavor, start with 2 ounces. For a significant kick, use 4 ounces. Adjust to your personal spice preference.
Process/Steps:
Cook the Pasta: Bring a large pot of salted water to a boil. Add the penne pasta and cook according to package directions until al dente. Reserve about 1 cup of the pasta cooking water before draining.
Make the Crispy 'Nduja Breadcrumbs: While the pasta cooks, heat a small skillet over medium heat. Add the crumbled 'Nduja. Cook, stirring occasionally, until the 'Nduja has rendered most of its fat and starts to crisp, about 3-5 minutes. Add the panko breadcrumbs and minced garlic (if using) to the skillet. Stir constantly until the breadcrumbs are golden brown and have absorbed the spicy 'Nduja fat, about 2-3 minutes. Be careful not to burn them. Remove the breadcrumbs from the skillet with a slotted spoon and set aside on a plate. Leave the spicy 'Nduja fat in the skillet.
Start the Sauce: In a large skillet or Dutch oven, heat the 2 tablespoons of olive oil over medium heat. Add the thinly sliced garlic and red pepper flakes. Cook, stirring constantly, until the garlic is fragrant and lightly golden (about 1 minute). Be careful not to burn the garlic, as it will turn bitter.
Build the 'Diavola' Flavor: Add the crumbled or chopped 'Nduja to the skillet with the garlic and chili flakes. Cook, stirring, until the 'Nduja melts and incorporates into the oil, releasing its spicy, porky goodness (about 2-3 minutes).
Add the Tomatoes: Pour in the crushed San Marzano tomatoes. Stir well to combine with the 'Nduja mixture. Bring the sauce to a simmer, then reduce the heat to low, cover, and let it cook for 10-15 minutes, allowing the flavors to meld and deepen. Season with salt and black pepper to taste.
Combine Pasta and Sauce: Drain the cooked pasta and add it directly to the skillet with the simmering sauce. Toss well to coat, adding a little of the reserved pasta cooking water if the sauce seems too thick.
Serve and Conquer: Divide the 'Arrabbiata Diavola' among bowls. Garnish generously with the crispy 'Nduja breadcrumbs and fresh torn basil. Offer grated Pecorino Romano cheese on the side, if desired.
Nutritional Estimate (per serving, approximate):
Calories: 650-750 (depending on portion size and amount of 'Nduja)
Fat: 30-40g (significant portion from 'Nduja)
Saturated Fat: 10-15g
Carbohydrates: 70-80g
Fiber: 6-8g
Sugar: 8-10g (naturally occurring from tomatoes)
Protein: 25-30g
Sodium: 800-1200mg (depending on salt added and 'Nduja content)
Disclaimer: This is an estimate and can vary based on specific ingredients used and portion sizes.
Dare to take on the 'Arrabbiata Diavola'? This is more than just a pasta dish; it's a spicy adventure that will test your limits and reward you with an incredibly flavorful and satisfying meal. Cook with caution... and enjoy the burn!

A rich and deeply flavorful curry with a complex, nutty, and savory-sweet profile. Inspired by the classic Middle Eastern dip, Muhammara, this dish features tender lamb meatballs simmered in a velvety sauce of roasted red peppers and toasted walnuts, finished with a tangy touch of pomegranate.
Inspiration for a new dish can come from anywhere, but sometimes the best ideas are born from deconstructing a classic. I've always been captivated by Muhammara, the vibrant Syrian dip made from roasted red peppers and walnuts. It’s smoky, sweet, tangy, and nutty all at once. One evening, while scooping some up with a piece of warm pita, a thought struck me: what if this complex flavor profile wasn't a dip, but the base for a rich, simmered curry?
This recipe is the delicious result of that "what if." The process begins by building layers of flavor. We roast the bell peppers ourselves, a step that is absolutely essential. As any chef will tell you, roasting coaxes out a deep, concentrated sweetness from the peppers that you simply can't get from a jar. We toast the walnuts to awaken their earthy, aromatic oils. These two ingredients are then blended into a velvety puree that becomes the soul of our curry.
For a sauce this bold, you need a protein that can stand up to it, and lamb is the perfect partner. Its distinct, savory flavor beautifully complements the sweet and tangy notes of the sauce. We infuse the meatballs with garlic and cumin, brown them to develop a delicious crust, and then let them simmer, absorbing all the wonderful flavors. The final touch, a swirl of pomegranate molasses, is the secret ingredient that ties everything together, adding a bright, tangy finish that makes the whole dish sing. This is more than a meal; it's a conversation piece. It felt good, so I cooked it.
Recipe
Yields: 4 servings Prep time: 20 minutes Cook time: 45 minutes
Ingredients:
For the Lamb Meatballs:
1 lb ground lamb
¼ cup plain breadcrumbs
1 large egg, lightly beaten
2 cloves garlic, minced
1 teaspoon ground cumin
½ teaspoon ground coriander
½ teaspoon salt
¼ teaspoon black pepper
2 tablespoons olive oil, for frying
For the Curry Sauce:
2 large red bell peppers (about 1 lb)
1 cup raw walnuts
1 tablespoon olive oil
1 large onion, finely chopped
3 cloves garlic, minced
1 teaspoon smoked paprika
½ teaspoon ground cinnamon
3 cups low-sodium beef or vegetable broth
1 tablespoon pomegranate molasses
Salt and freshly ground black pepper to taste
For Garnish:
Full-fat plain yogurt or labneh
Fresh pomegranate seeds (arils)
Fresh mint leaves, chopped
Process/Steps:
Roast the Peppers: Preheat your oven's broiler to high. Place the whole red bell peppers on a baking sheet and broil for 10-15 minutes, turning every few minutes, until the skin is blackened and blistered on all sides. Transfer the hot peppers to a bowl and cover tightly with plastic wrap to steam for 10 minutes.
Toast the Walnuts: While the peppers are steaming, place the walnuts in a dry skillet over medium heat. Toast for 4-6 minutes, tossing frequently, until they are fragrant and slightly browned. Be careful not to burn them. Set aside.
Form the Meatballs: In a medium bowl, combine the ground lamb, breadcrumbs, egg, minced garlic, cumin, coriander, salt, and pepper. Mix gently with your hands until just combined—do not overwork the mixture. Form into 1-inch meatballs (you should get about 16-20).
Brown the Meatballs: In a large Dutch oven or heavy-bottomed pot, heat 2 tablespoons of olive oil over medium-high heat. Add the meatballs in a single layer and brown on all sides. You may need to do this in two batches. Remove the browned meatballs and set them on a plate.
Prepare the Sauce Base: Once the peppers are cool enough to handle, peel away the blackened skin, remove the stems and seeds, and roughly chop the flesh.
Build the Curry: In the same pot used for the meatballs, reduce the heat to medium and add 1 tablespoon of olive oil. Add the chopped onion and cook until softened, about 5-7 minutes. Add the minced garlic, smoked paprika, and cinnamon, and cook for another minute until fragrant.
Blend the Sauce: Transfer the onion mixture to a high-speed blender. Add the roasted pepper flesh, toasted walnuts, and 1 cup of the broth. Blend until completely smooth and velvety.
Simmer and Finish: Pour the blended sauce back into the pot. Stir in the remaining 2 cups of broth and the pomegranate molasses. Bring to a gentle simmer, then return the browned meatballs to the pot. Reduce the heat to low, cover, and simmer for 20 minutes, allowing the meatballs to cook through and the flavors to meld. Season with salt and pepper to taste.
Serve: Ladle the curry and meatballs into bowls. Garnish generously with a dollop of yogurt, a sprinkle of pomegranate seeds, and fresh mint. Serve with warm pita or couscous.
Nutritional Estimate (per serving, based on 4 servings):
Calories: 730
Fat: 58g
Saturated Fat: 15g
Carbohydrates: 22g
Fiber: 7g
Sugar: 10g
Protein: 34g
Disclaimer: This is an estimate based on the ingredients listed and may vary.

This curry is a testament to how traditional flavors can be reimagined into something new and exciting. Enjoy this rich, rustic, and deeply satisfying dish.

Get ready for a culinary mashup that’s as bold and bright as a summer fiesta! Our Creamy Jalapeño Lime Fiesta Curry is where the zesty spirit of Mexican and Latin American cuisine dances harmoniously with the comforting richness of a mild Indian-inspired curry. Imagine tender pieces of your favorite protein – chicken, beef, or shrimp – swimming in a luscious, creamy sauce bursting with the fresh heat of jalapeños, the tangy brightness of lime, and a subtle warmth that’s more of a gentle hug than a fiery inferno. Served over fluffy rice or with warm naan for soaking up every last drop, this is fusion done right: exciting, unexpected, and utterly delicious.
I've taken a hard look at how much Mexican and Indian foods are similar, despite being on totally opposite sides of the planet. It's actually interesting (and I won't bore you now) that Central and South American influence plays a huge roll in Indian food. Peppers originate from South America - somehow they got into Indian food...
You know I’m all about those unique flavor combinations, the kind that make you rethink what your taste buds thought they knew. And this idea? It’s been simmering in my brain for a while now. Why not take the vibrant, fresh flavors I often crave from south of the border – that kick of jalapeño, that zing of lime – and weave them into the comforting embrace of a creamy curry sauce? It felt like a culinary adventure waiting to happen, a chance to celebrate the incredible diversity of global flavors right here in our own kitchens.
The beauty of this dish lies in its balanced boldness. We’re not trying to create a blazing hot curry that overwhelms your senses. Instead, we’re focusing on the flavor of the jalapeño – that grassy, slightly fruity heat – and the vibrant, acidic punch of fresh lime. To tame the potential fire and create that signature curry creaminess, coconut milk steps in as our star. It provides a luxurious richness without overpowering the other bright notes, acting as the perfect canvas for our flavor fiesta.
We’ll start by gently sautéing aromatic onions and garlic, building a foundation of savory goodness. Then come the jalapeños – you can adjust the amount and whether you remove the seeds and membranes depending on your preferred level of heat. Roasting a few beforehand can add a wonderful smoky depth, bringing another layer of complexity without leaning too heavily into any one regional style. A touch of ground cumin and coriander adds a subtle warmth, a nod to traditional curry spices, but used sparingly to keep the focus firmly on the jalapeño and lime.
The protein – be it succulent chicken, tender beef, or plump shrimp – will soak up all these incredible flavors as it simmers in the creamy sauce. The finishing touch? A generous squeeze of fresh lime juice and a sprinkle of chopped cilantro to really make those vibrant notes sing.
This Creamy Jalapeño Lime Fiesta Curry is more than just a meal; it’s a celebration of culinary creativity. It’s a testament to the idea that flavors from different parts of the world can come together in the most harmonious and delicious ways. It’s quick enough for a satisfying weeknight dinner, yet unique enough to impress guests. So, get ready to embark on a flavor journey that’s both familiar and fantastically new. Trust me, this fiesta in a bowl is one you won’t want to miss!
Yields: 4 servings Prep time: 20 minutes Cook time: 25-30 minutes
Ingredients:
1.5 lbs boneless, skinless chicken thighs or breasts, cut into 1-inch pieces (or equivalent amount of beef or shrimp)
1 tablespoon olive oil or neutral cooking oil
1 large yellow onion, chopped
2-3 jalapeño peppers, seeded and minced (adjust to your spice preference), some optionally roasted for smoky flavor
3-4 cloves garlic, minced
1 teaspoon ground cumin
1/2 teaspoon ground coriander
1 (13.5 oz) can full-fat coconut milk
1/2 cup chicken broth (if using chicken; beef broth if using beef; vegetable broth if using shrimp for a lighter option)
Juice and zest of 2 limes
1/4 cup chopped fresh cilantro
Salt to taste
Optional thickening agent: 1 teaspoon cornstarch mixed with 2 tablespoons cold water
For Serving:
Cooked rice (white or brown)
Warm naan bread
Equipment:
Large skillet or Dutch oven
Instructions:
Sauté Aromatics: Heat the oil in a large skillet or Dutch oven over medium heat. Add the chopped onion and cook until softened, about 5 minutes. Add the minced jalapeños and garlic and cook for another minute until fragrant.
Add Spices and Protein: Stir in the ground cumin and coriander and cook for about 30 seconds until fragrant. Add the chicken (or beef or shrimp) to the skillet and cook until lightly browned on all sides.
Add Liquids and Simmer: Pour in the coconut milk and the appropriate broth. Bring the mixture to a gentle simmer, scraping up any browned bits from the bottom of the pan. Cover and simmer for 10-15 minutes for chicken (longer for beef, less for shrimp until pink and cooked through), or until the protein is cooked through and tender.
Lime and Cilantro: Stir in the fresh lime juice and lime zest. Add the chopped fresh cilantro.
Thicken if Needed (Optional): If you prefer a thicker sauce, stir the cornstarch slurry into the simmering curry and cook for 1-2 minutes, stirring constantly, until the sauce thickens to your desired consistency. I've really never needed to do this.
Season and Serve: Season the curry with salt to taste. Serve hot over cooked rice and/or with warm naan bread for dipping.

A Flaky Dance of Savory Elegance
Prepare to elevate your appetizer game with these Smoked Salmon & Dill Cream Cheese Palmiers, a dish that effortlessly marries the delicate richness of smoked salmon with the fresh zest of dill and the creamy embrace of cream cheese, all nestled within impossibly flaky puff pastry. It’s a sophisticated bite that belies its simple preparation, offering a delightful crunch followed by a burst of savory, herbaceous flavor. Perfect for a thoughtful dinner starter, a quick yet elegant lunch, or a standout addition to any gathering, these palmiers are a testament to how familiar ingredients can be transformed into something truly special.
There's something inherently satisfying about taking a humble ingredient and transforming it into a showstopper. And when that ingredient is puff pastry – oh, the possibilities! We've had some fun with puff pastry on the blog before, and it seems you all enjoy its versatility as much as I do. So, when the idea of combining it with the timeless duo of smoked salmon and dill cream cheese popped into my head, it felt like a perfectly natural, yet delightfully novel, next step in our culinary adventure.
My mind immediately went to those classic French palmiers, usually sweet and dusted with sugar. But what if we flipped the script? What if we took that elegant, rolled, and sliced shape and filled it with something savory, something that spoke to my love for quick, yet thoughtful bites? Smoked salmon, with its luxurious texture and subtle brininess, seemed like the ideal partner. And dill? Well, dill and salmon are simply meant to be together – a match made in culinary heaven.
The beauty of these palmiers lies in their simplicity, which is perfect for my "eyeballer" tendencies when working with familiar flavors. A block of cream cheese, softened to perfection, mixed with a generous handful of fresh dill, a squeeze of lemon for brightness, and a pinch of salt and pepper. Spread that creamy goodness over a sheet of thawed puff pastry, layer on thin slices of smoked salmon, and then comes the fun part: rolling.
It's like creating a little pastry scroll, bringing the flavors together in a tight embrace. A quick chill in the fridge ensures they hold their shape, making slicing a breeze. Then, into the oven they go, transforming from pale, soft rolls into golden, crispy, architectural wonders. The aroma that fills the kitchen is pure anticipation – a hint of buttery pastry, fresh dill, and that unmistakable scent of smoked salmon.
The first bite is pure joy. The shattering crispness of the pastry gives way to the smooth, tangy cream cheese and the tender, smoky salmon. It’s a symphony of textures and flavors – savory, fresh, and utterly satisfying. These aren't just appetizers; they're little moments of culinary delight, perfect for sharing with friends (because food is what brings people together, right?) or savoring quietly with a cup of tea for a quick, elegant lunch. They feel good to cook, and they feel even better to eat.
So, if you're looking for a dish that's a little bit fancy, a little bit fun, and a whole lot delicious, these Smoked Salmon & Dill Cream Cheese Palmiers are your next appetizer slam.
"If it feels good, cook it!" – and these definitely feel good.

Escape the ordinary with this Spiced Coconut Curry Cornish Hen, a dish that marries the delicate tenderness of Cornish hens with the vibrant, aromatic embrace of Indian spices and creamy coconut milk. It’s an unexpected yet harmonious culinary journey that promises a symphony of flavors and a comforting warmth perfect for any occasion. Get ready to transform a simple meal into an exotic experience that will tantalize your taste buds and leave you craving more.
There are days when the humdrum of routine begs for a vibrant interruption, a burst of flavor that transports you beyond the familiar. Lately, my culinary wanderings have led me down fragrant spice routes, a journey ignited by a simple thought: how can we elevate the humble Cornish hen beyond the predictable? The answer, as it often does, lay in the rich tapestry of Indian cuisine.
While the fiery allure of tandoori is undeniable, I found myself drawn to the comforting embrace of a creamy coconut curry. The idea of these petite poultry soaking in a luscious, spice-infused coconut milk seemed utterly irresistible. It felt like a culinary hug, a dish that promised both elegance and profound flavor. And it's... probably the most delicate chicken you could use... So good. So good.
The process began with gathering the aromatic players: fragrant ginger and garlic, the warmth of turmeric and cumin, the subtle sweetness of cinnamon and cardamom, and a gentle hint of chili to awaken the senses. The kitchen soon filled with their intoxicating perfume as they sizzled gently in coconut oil, the foundation upon which our curry would be built.
Preparing the Cornish hens felt almost ceremonial. Their small size makes them perfect for individual servings, each a self-contained vessel of flavor waiting to be unlocked. A quick sear in the fragrant oil gave them a beautiful golden hue, a promise of the deliciousness to come. Then came the velvety embrace of coconut milk, its richness enveloping the spiced vegetables and the now-golden hens.
As the curry simmered gently, the aromas deepened, a tantalizing blend of sweet coconut and earthy spices. The anticipation was almost unbearable! Finally, the moment arrived. Served over fluffy basmati rice, each Cornish hen glistened, coated in the fragrant curry. The first bite was a revelation – the tender, juicy meat falling off the bone, infused with the creamy, spiced sauce. The subtle sweetness of the coconut milk balanced the warmth of the spices perfectly, creating a harmonious and utterly satisfying experience. A sprinkle of fresh cilantro added a final flourish of brightness, cutting through the richness and adding a fresh, herbaceous note.
This Spiced Coconut Curry Cornish Hen isn't just a meal; it's an experience. It’s about taking a moment to savor the complexity of flavors, the tenderness of the meat, and the comforting warmth of a well-crafted curry. It’s a reminder that even the simplest ingredients can be transformed into something extraordinary with a little culinary curiosity and a blend of fragrant spices. Whether it's a cozy weeknight dinner or a special occasion, this dish is sure to impress and delight. While this could easily be like any other coconut curry, the sauce compliments the very delicate, rich chicken that is involved in this recipe. While you can use regular chicken... You'll miss out on this experience!
Spiced Coconut Curry Cornish Hen
Yields: 2 servings Prep time: 25 minutes Cook time: 45 minutes
Ingredients:
2 Cornish hens (about 1-1.25 lbs each), patted dry
1 tablespoon coconut oil
1 medium onion, finely chopped
2 cloves garlic, minced
1 inch ginger, grated
1 green chili, finely chopped (optional, adjust to your spice preference)
1 teaspoon ground turmeric
1 teaspoon ground cumin
1/2 teaspoon ground coriander
1/4 teaspoon ground cinnamon
1/4 teaspoon ground cardamom
1/4 teaspoon red chili powder (optional, for color and heat)
1 (13.5 oz) can full-fat coconut milk
1/2 cup chicken broth or water
1 tablespoon lemon juice
Salt to taste
Fresh cilantro, chopped, for garnish
Cooked basmati rice or naan, for serving
Equipment:
Large skillet or Dutch oven
Sharp knife
Instructions:
Prepare the Hens: Pat the Cornish hens completely dry with paper towels. This will help them develop a better sear. You can leave them whole or spatchcock them for faster and more even cooking. To spatchcock, place the hen breast-side down on a cutting board. Using kitchen shears, cut along both sides of the backbone to remove it. Flip the hen over and press down firmly on the breastbone to flatten it.
Sauté Aromatics: Heat the coconut oil in a large skillet or Dutch oven over medium heat. Add the chopped onion and sauté until softened and translucent, about 5-7 minutes.
Bloom the Spices: Add the minced garlic, grated ginger, and chopped green chili (if using) to the skillet. Sauté for another minute until fragrant, being careful not to burn the garlic.
Introduce the Ground Spices: Stir in the ground turmeric, cumin, coriander, cinnamon, cardamom, and red chili powder (if using). Cook for about 30 seconds, stirring constantly, until the spices are fragrant. This process, called "blooming," helps to release their full flavor.
Add Liquid and Hens: Pour in the coconut milk and chicken broth (or water). Bring the mixture to a gentle simmer, scraping up any browned bits from the bottom of the pan. Season with salt to taste.
Simmer the Hens: Carefully place the Cornish hens into the simmering curry sauce. If the sauce doesn't fully cover the hens, you can gently spoon some over them. Reduce the heat to low, cover the skillet, and let the hens simmer for 30-35 minutes for whole hens, or 25-30 minutes for spatchcocked hens, or until they are cooked through and the internal temperature reaches 165°F (74°C). Ensure the juices run clear when pierced with a knife or fork in the thickest part of the thigh.
Finish and Serve: Once the hens are cooked, remove them from the skillet and set aside on a cutting board. Increase the heat under the skillet to medium and let the curry sauce simmer uncovered for a few minutes to thicken slightly, if desired. Stir in the lemon juice.
Carve (Optional) and Garnish: If you kept the hens whole, you can serve them as is or carve them into halves before serving. Spoon the fragrant coconut curry sauce generously over the hens. Garnish with freshly chopped cilantro.
Serve: Serve the Spiced Coconut Curry Cornish Hen hot with fluffy basmati rice or warm naan bread to soak up all that delicious sauce. A side of raita (yogurt dip) can also be a refreshing accompaniment.
Nutritional Estimate (per serving, approximately):
Calories: 550-700 (depending on portion size and accompaniments)
Protein: 40-50g
Fat: 35-50g (primarily from coconut milk)
Carbohydrates: 15-30g (varies with the amount of sauce consumed)
Please note that this is an estimate and the exact nutritional content may vary based on the specific ingredients used and portion sizes.
This Spiced Coconut Curry Cornish Hen is more than just a recipe; it’s an invitation to explore the beautiful intersection of global flavors in the most elegant way possible (maybe duck next time? We'll see...). It's a testament to how familiar ingredients can be transformed into something truly special with the right blend of spices and a touch of culinary curiosity. I hope you find as much joy in creating and savoring this dish as I did in envisioning it. Happy cooking, and may your kitchen always be filled with delightful aromas!

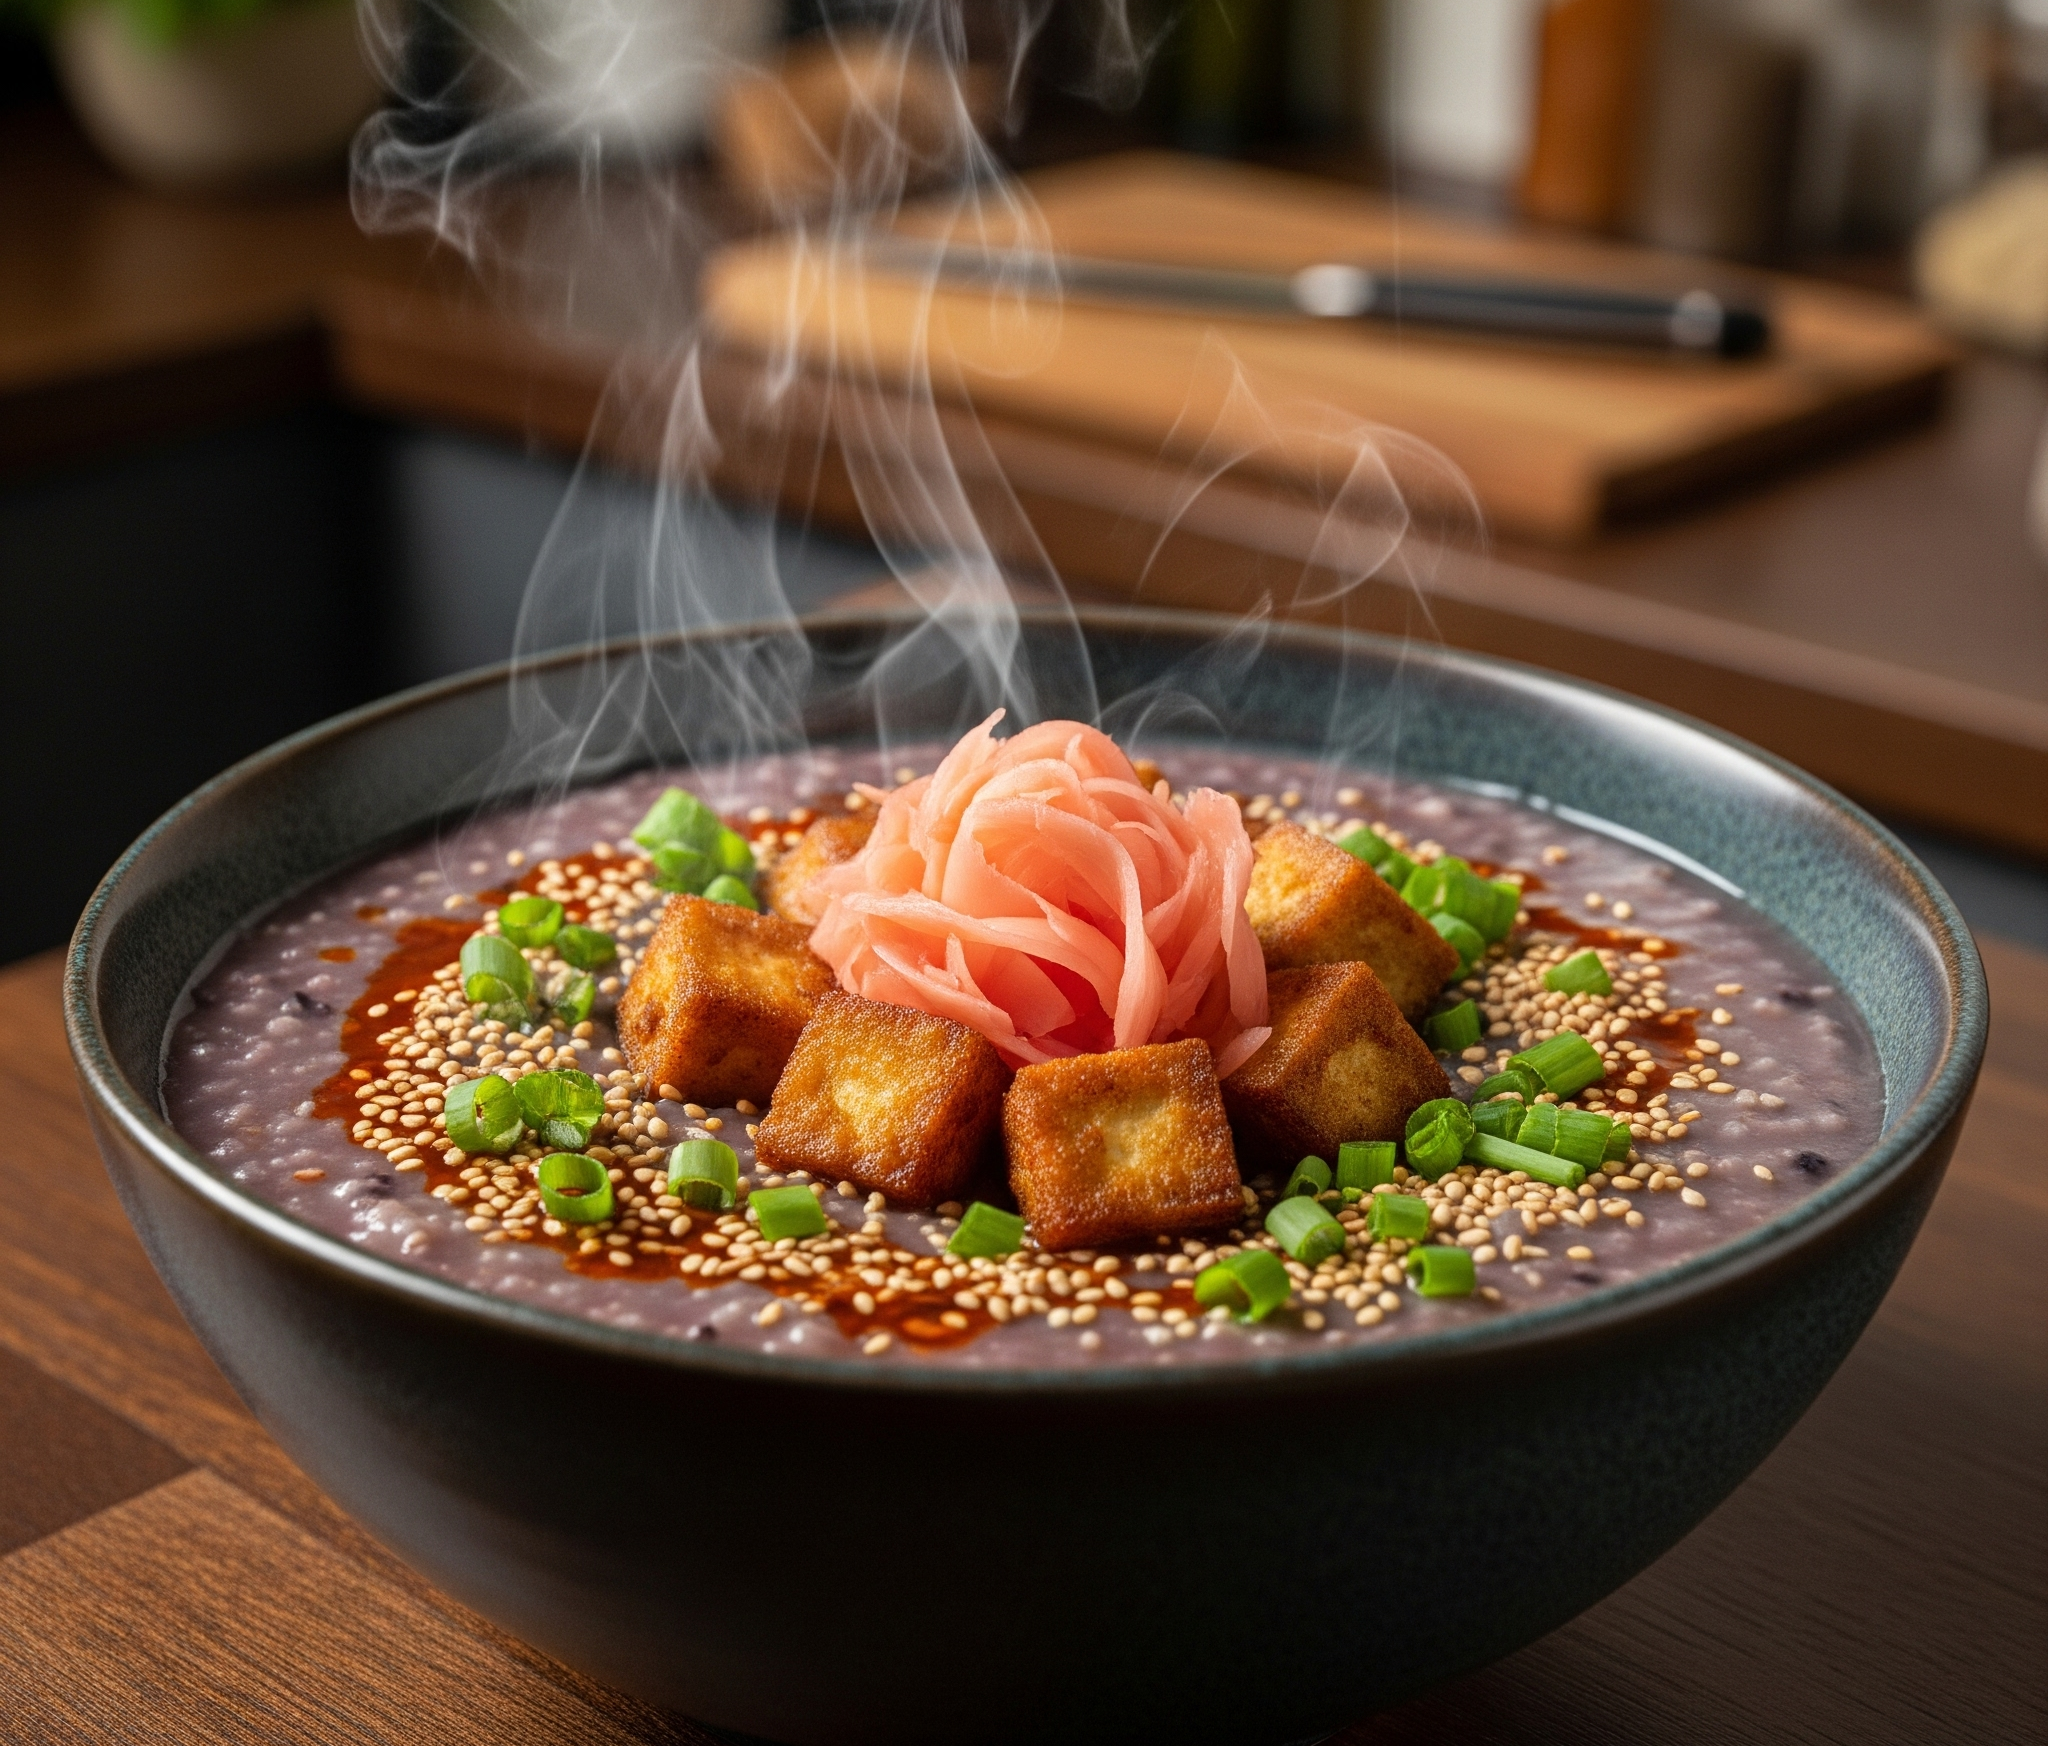
Midnight Bloom:
Start your day (or any meal!) with this deeply comforting yet vibrantly flavorful vegan creation. Creamy, nutty forbidden rice congee provides a soothing base for intensely crispy chili-garlic tofu and delicate, tangy pickled ginger blossoms. It's a global fusion in a bowl that's both nourishing and utterly delicious. Try not to call it a "porridge"...!
Here at "Edible Intelligence," we're always seeking out dishes that not only taste fantastic but also offer a unique experience. This Forbidden Rice Congee is exactly that – a culinary journey that blends Asian comfort with a bold, modern twist.
Forbidden rice, with its striking dark purple hue and subtly nutty flavor, forms the heart of this dish. Slowly simmered into a creamy congee (a type of rice porridge), it offers a soothing and satisfying base. But this is no ordinary bland porridge! We're elevating it with a topping of tofu that achieves ultimate crispy perfection, then gets tossed in a homemade chili-garlic oil that's both fiery and fragrant.
And for the final touch of brilliance? Delicate "blossoms" of pickled ginger, thinly sliced to resemble ethereal petals, adding a tangy, slightly sweet counterpoint to the richness of the congee and the heat of the tofu. It’s a visual and textural masterpiece in a bowl.
This Forbidden Rice Congee with Crispy Chili-Garlic Tofu & Pickled Ginger Blossoms is:
Ready to embark on this flavorful adventure? Let's get cooking!
Creamy forbidden rice porridge topped with intensely crispy chili-garlic tofu and delicate pickled ginger "blossoms."
Yields: 2-3 servings Prep time: 30 minutes (plus rice soaking time, optional) Cook time: 1 hour 30 minutes (mostly simmering)
Ingredients:
For the Forbidden Rice Congee:
For the Crispy Chili-Garlic Tofu:
For the Pickled Ginger Blossoms:
Optional Garnishes:
Instructions:
1. Prepare the Forbidden Rice Congee: * If soaking the rice, rinse it thoroughly and submerge it in water for 1-2 hours. Drain well. (If not soaking, just rinse thoroughly.) * In a medium pot, combine the rinsed forbidden rice, vegetable broth (start with 6 cups, you can add more later if needed for desired consistency), sliced ginger, smashed garlic, and salt. * Bring to a boil, then reduce heat to low, cover, and simmer gently for 1 to 1.5 hours, or until the rice grains have broken down and the congee is creamy and thickened. Stir occasionally to prevent sticking. Add more broth or water during cooking if the congee becomes too thick. * Once cooked, remove the ginger slices and garlic clove. Taste and adjust salt as needed. Keep warm over low heat.
2. Prepare the Crispy Chili-Garlic Tofu: * Cut the pressed tofu into ½-inch cubes. * In a medium bowl, toss the tofu cubes with cornstarch until evenly coated. * Heat the neutral oil in a large skillet or wok over medium-high heat. * Add the tofu cubes in a single layer (you may need to work in batches) and cook, turning occasionally, until golden brown and crispy on all sides (about 8-10 minutes). Remove the crispy tofu with a slotted spoon and set aside on a paper towel-lined plate. * Drain any excess oil from the skillet. Reduce the heat to medium and add the minced garlic and sliced chili peppers (or red pepper flakes). Cook for about 30 seconds until fragrant, being careful not to burn the garlic. * Return the crispy tofu to the skillet. Add the soy sauce (or tamari), rice vinegar, and optional maple syrup. Toss gently to coat the tofu evenly with the sauce. Cook for another minute until the sauce has slightly thickened and glazed the tofu.
3. Create the Pickled Ginger Blossoms: * Take each slice of pickled ginger and carefully separate it into thinner pieces. Arrange these thin pieces overlapping slightly in a circular pattern to resemble small blossoms or petals. Set aside.
4. Assemble and Serve: * Ladle the warm forbidden rice congee into bowls. * Top generously with the crispy chili-garlic tofu. * Garnish with the pickled ginger blossoms. * Sprinkle with toasted sesame seeds and chopped scallions, and drizzle with chili oil (if using). * Serve immediately and enjoy!
Nutritional Estimate (per serving, approximate, for 3 servings):
(Note: This is an estimate and will vary based on specific ingredient amounts and portion sizes.)
This Forbidden Rice Congee with Crispy Chili-Garlic Tofu & Pickled Ginger Blossoms is a testament to how simple ingredients can come together to create something truly extraordinary. The creamy, nutty congee provides the perfect canvas for the bold flavors and textures of the crispy tofu and tangy ginger. It’s a dish that soothes the soul while exciting the palate – a true "Edible Intelligence" experience!

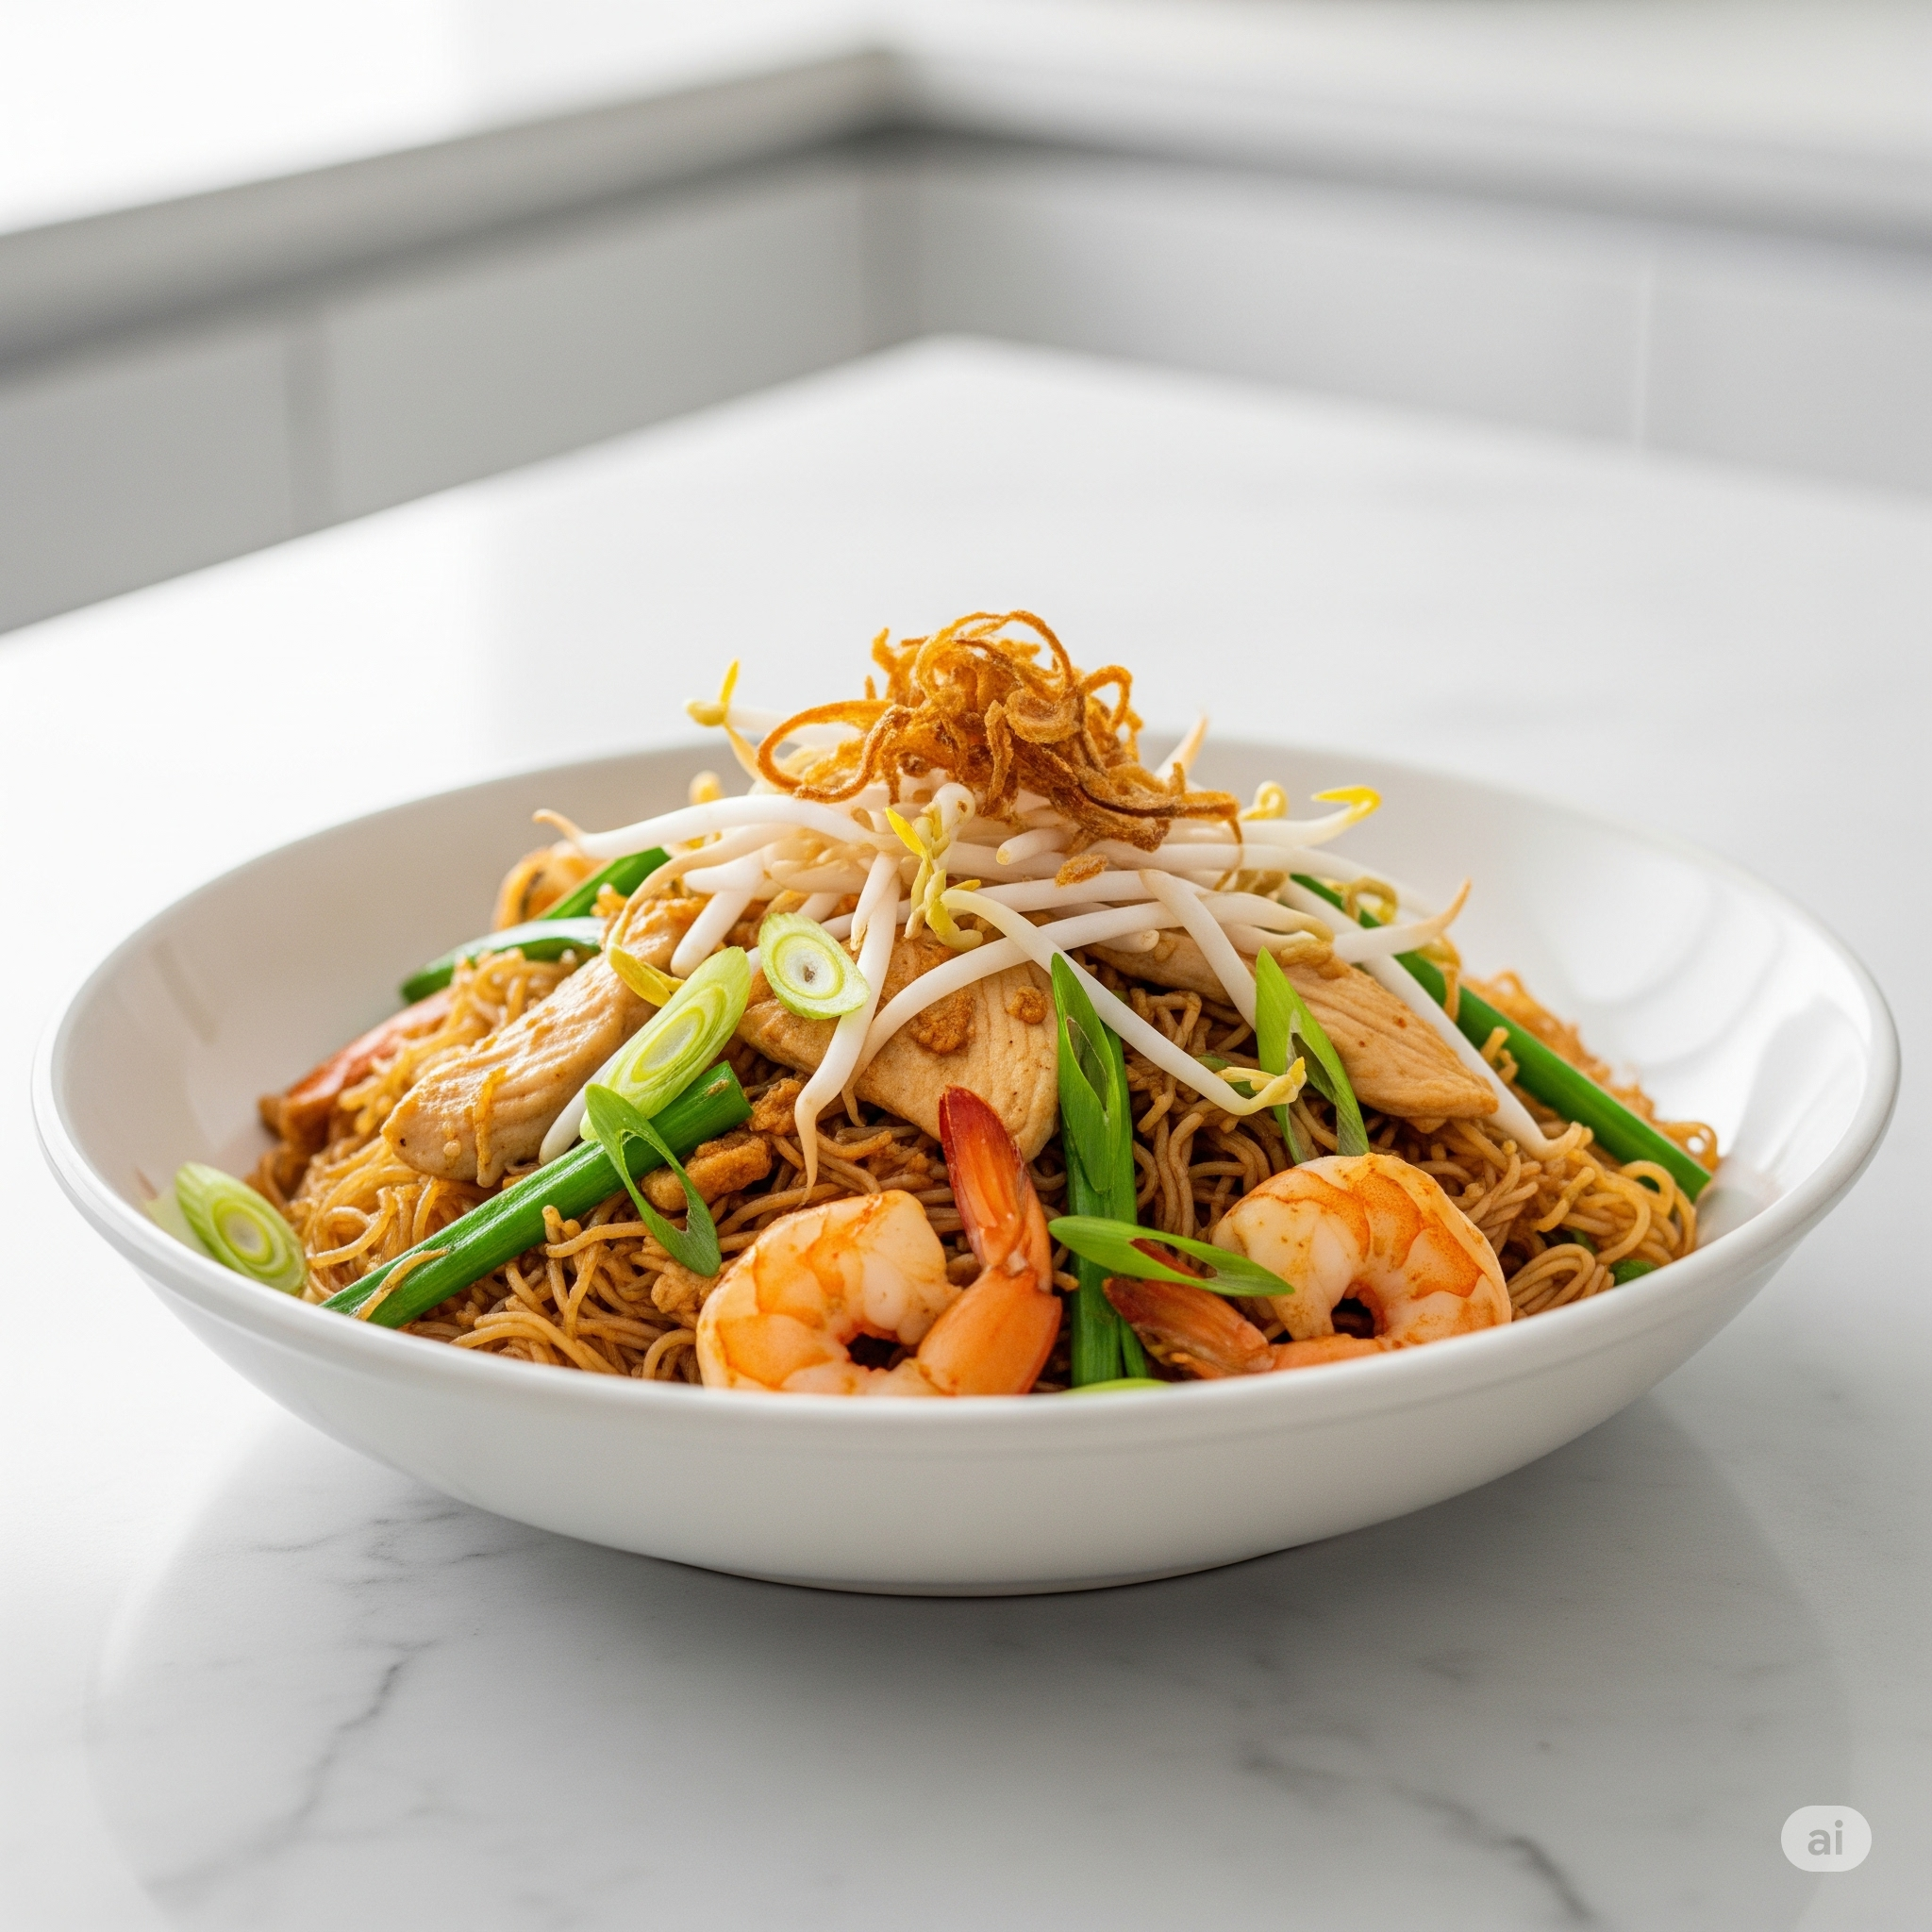
Imagine the bustling, vibrant energy of a Singaporean hawker stall meeting the regal, aromatic allure of a traditional Indian kitchen. This Singaporean Mei Fun Biryani is precisely that—a culinary masterpiece born from a love of two iconic dishes. It takes the familiar, wok-kissed comfort of curry-infused rice vermicelli and elevates it through the sophisticated, slow-steamed layering technique of biryani. The result is a dish that's both excitingly new and deeply comforting, with each forkful revealing fragrant noodles, tender marinated chicken, plump shrimp, and the satisfying crunch of fresh vegetables. It's a culinary adventure that respects its roots while creating something utterly unique.
I've always been captivated by the seemingly effortless perfection of Singapore Mei Fun. It's a dish that has to be just right—the noodles perfectly cooked, the curry flavor present but not overpowering, and a delightful mix of textures from shrimp, pork, and crisp vegetables. On the other hand, a great biryani is an event. It's a celebration of spices, with layers of fragrant basmati rice and succulent meat, all slow-cooked to perfection in a sealed pot, a technique known as dum. The idea of combining them felt both audacious and irresistible.
The challenge was clear: how to infuse the delicate, quick-cooking nature of rice vermicelli with the deep, melded flavors of a dum-cooked biryani without turning the noodles to mush? The secret lay in reimagining the process. Instead of cooking the noodles and rice separately, I decided to treat the mei fun noodles as if they were the rice. By creating a rich, flavorful biryani-style masala gravy and layering it with soaked (but uncooked) noodles, fresh herbs, and crispy fried onions, we could use a very short, gentle steaming process. This allows the noodles to absorb all the aromatic steam from the masala below, cooking them perfectly while soaking up the complex flavors of cardamom, cinnamon, cloves, and saffron, all bridged by that signature touch of Madras curry powder.
The experience of making it is a sensory journey. The kitchen fills with the heady aroma of whole spices toasting, followed by the savory sizzle of the masala. The final moment of opening the pot is a true reveal—a cloud of fragrant steam gives way to beautifully cooked, saffron-tinged noodles, jeweled with chicken, shrimp, and herbs. It’s a dish that will impress a seasoned cook with its technique but is surprisingly straightforward for a beginner to master.
For the Noodles & Saffron:
For the Marinade (Chicken & Shrimp):
For the Biryani Masala:
For Layering & Garnish:
Prepare the Key Components:
Fry the Onions (Birista):
Create the Masala:
Layer and "Dum" (Steam):
Serve:
(This is an approximation and can vary based on specific ingredients used.)
This Singaporean Mei Fun Biryani is more than just a recipe; it's a conversation between two culinary worlds. We hope you enjoy the process of creating and sharing this unique and delicious dish. Happy cooking!


